Juniper

Juniper SRX IPSec Quick Commands

Juniper SRX IPSec Quick Commands

Over the last couple of years, the company I work for has become more and more involved in looking after customer SRX firewalls, either as a managed service, or simply on a remote technical support basis. Quite a lot of those customers have IPSec tunnels numbering in the hundreds (the biggest has 850+ on an SRX240 cluster, which is approaching the 1000 tunnel limit supported by the SRX240 platform), and whilst that isn’t a huge number where models like the SRX3xxx or SRX54xxx line is concerned, it’s still a huge number to have to parse through and diagnose issues. As a consequence, I started saving simple Linux command combinations for parsing the SRX output, so what follows are Juniper SRX IPSec quick commands, which I’ll add too as time goes on.

Show IPsec Tunnels Based on Index Value

OK, so you’ve got 850 tunnels, of which 250 are related to one customer. You need to show detailed information for a report, or log purposes. First, run ‘show security ipsec security-associations | match <remote_peer_ip>’ (1.2.3.4) in my example –

 <955 ESP:aes-cbc-256/sha1 7adbd7ba 1723/ unlim - root 500 1.2.3.4 
 >955 ESP:aes-cbc-256/sha1 c1a8e6d0 1723/ unlim - root 500 1.2.3.4 
 <963 ESP:aes-cbc-256/sha1 c261b766 6461/ unlim - root 500 1.2.3.4 
 >963 ESP:aes-cbc-256/sha1 9808343e 6461/ unlim - root 500 1.2.3.4 
 <969 ESP:aes-cbc-256/sha1 b61ef91a 7901/ unlim - root 500 1.2.3.4 
 >969 ESP:aes-cbc-256/sha1 d459398f 7901/ unlim - root 500 1.2.3.4 
 <472 ESP:aes-cbc-256/sha1 1ee64eea 7696/ unlim - root 500 1.2.3.4 
 >472 ESP:aes-cbc-256/sha1 116bae2f 7696/ unlim - root 500 1.2.3.4 
 <961 ESP:aes-cbc-256/sha1 b95d7d52 3967/ unlim - root 500 1.2.3.4 
 >961 ESP:aes-cbc-256/sha1 2181b470 3967/ unlim - root 500 1.2.3.4 
 <927 ESP:aes-cbc-256/sha1 5b329b28 8232/ unlim - root 500 1.2.3.4 
 >927 ESP:aes-cbc-256/sha1 818e8e95 8232/ unlim - root 500 1.2.3.4 
 <913 ESP:aes-cbc-256/sha1 f0c86d2b 6481/ unlim - root 500 1.2.3.4 
 >913 ESP:aes-cbc-256/sha1 86e6ac9d 6481/ unlim - root 500 1.2.3.4 
 <849 ESP:aes-cbc-256/sha1 44636b47 3327/ unlim - root 500 1.2.3.4 
 >849 ESP:aes-cbc-256/sha1 f0bb1e56 3327/ unlim - root 500 1.2.3.4 
 <959 ESP:aes-cbc-256/sha1 f7134e72 5356/ unlim - root 500 1.2.3.4 
 >959 ESP:aes-cbc-256/sha1 ca7c6ca4 5356/ unlim - root 500 1.2.3.4 
 <919 ESP:aes-cbc-256/sha1 a8d17b61 2110/ unlim - root 500 1.2.3.4 
 >919 ESP:aes-cbc-256/sha1 f1dba7f2 2110/ unlim - root 500 1.2.3.4 
 <925 ESP:aes-cbc-256/sha1 a8656ce1 7193/ unlim - root 500 1.2.3.4 
 >925 ESP:aes-cbc-256/sha1 7fac5d04 7193/ unlim - root 500 1.2.3.4 
 <479 ESP:aes-cbc-256/sha1 c1e43feb 7300/ unlim - root 500 1.2.3.4 
 >479 ESP:aes-cbc-256/sha1 f40830b5 7300/ unlim - root 500 1.2.3.4 
 <847 ESP:aes-cbc-256/sha1 9981358f 27442/unlim - root 500 1.2.3.4 
 >847 ESP:aes-cbc-256/sha1 ee0041be 27442/unlim - root 500 1.2.3.4 
 <967 ESP:aes-cbc-256/sha1 176837ff 8747/ unlim - root 500 1.2.3.4 
 >967 ESP:aes-cbc-256/sha1 1ebfca2 8747/ unlim - root 500 1.2.3.4 
 <981 ESP:aes-cbc-256/sha1 bc8158c1 6710/ unlim - root 500 1.2.3.4 
 >981 ESP:aes-cbc-256/sha1 d47ddf1e 6710/ unlim - root 500 1.2.3.4 
 <915 ESP:aes-cbc-256/sha1 deb2e014 8053/ unlim - root 500 1.2.3.4 
 >915 ESP:aes-cbc-256/sha1 1552f027 8053/ unlim - root 500 1.2.3.4 
 <857 ESP:aes-cbc-256/sha1 1f77087b 7264/ unlim - root 500 1.2.3.4 
 >857 ESP:aes-cbc-256/sha1 bdcc90f 7264/ unlim - root 500 1.2.3.4 
 <923 ESP:aes-cbc-256/sha1 2761d752 6389/ unlim - root 500 1.2.3.4 
 >923 ESP:aes-cbc-256/sha1 59bcc562 6389/ unlim - root 500 1.2.3.4 
 <965 ESP:aes-cbc-256/sha1 289fc4a1 8045/ unlim - root 500 1.2.3.4 
 >965 ESP:aes-cbc-256/sha1 4ad83567 8045/ unlim - root 500 1.2.3.4 
 <853 ESP:aes-cbc-256/sha1 b9dfde99 5515/ unlim - root 500 1.2.3.4 
 >853 ESP:aes-cbc-256/sha1 63fe23a2 5515/ unlim - root 500 1.2.3.4 
 <973 ESP:aes-cbc-256/sha1 ec3def97 5246/ unlim - root 500 1.2.3.4 
 >973 ESP:aes-cbc-256/sha1 e7b6fd05 5246/ unlim - root 500 1.2.3.4 
 <917 ESP:aes-cbc-256/sha1 30d89c7c 6650/ unlim - root 500 1.2.3.4 
 >917 ESP:aes-cbc-256/sha1 6918cd5a 6650/ unlim - root 500 1.2.3.4 
 <987 ESP:aes-cbc-256/sha1 16f1dd88 5762/ unlim - root 500 1.2.3.4 
 >987 ESP:aes-cbc-256/sha1 8b0b08cc 5762/ unlim - root 500 1.2.3.4 
 <941 ESP:aes-cbc-256/sha1 3875c290 9003/ unlim - root 500 1.2.3.4 
 >941 ESP:aes-cbc-256/sha1 827e5a3 9003/ unlim - root 500 1.2.3.4 
 <1011 ESP:aes-cbc-256/sha1 8cd1107d 8409/ unlim - root 500 1.2.3.4 
 >1011 ESP:aes-cbc-256/sha1 d8d41c4a 8409/ unlim - root 500 1.2.3.4 
 <1009 ESP:aes-cbc-256/sha1 378df4a 8684/ unlim - root 500 1.2.3.4 
 >1009 ESP:aes-cbc-256/sha1 111a9b87 8684/ unlim - root 500 1.2.3.4 
 <991 ESP:aes-cbc-256/sha1 a1b94904 6334/ unlim - root 500 1.2.3.4 
 >991 ESP:aes-cbc-256/sha1 be9b3b07 6334/ unlim - root 500 1.2.3.4 
 <975 ESP:aes-cbc-256/sha1 d9bdff5d 5147/ unlim - root 500 1.2.3.4 
 >975 ESP:aes-cbc-256/sha1 d2b9a1c0 5147/ unlim - root 500 1.2.3.4 
 <855 ESP:aes-cbc-256/sha1 f0cc56e0 8902/ unlim - root 500 1.2.3.4 
 >855 ESP:aes-cbc-256/sha1 c8671fe 8902/ unlim - root 500 1.2.3.4 
 <1005 ESP:aes-cbc-256/sha1 33f7c862 4234/ unlim - root 500 1.2.3.4 
 >1005 ESP:aes-cbc-256/sha1 1ae9d135 4234/ unlim - root 500 1.2.3.4

Running ‘show security ipsec security-associations index <index value> detail’ against each of those will take AGES!! Try this instead –

cat << EOF | sed '/>/d' | awk '{print $1}' | sed 's/</show security ipsec security-associations index /' | sed 's/$/ detail/'

Once you hit enter, paste in the output from the SRX ‘show’ command, and type ‘EOF’ at the end. What you’ll get is –

show security ipsec security-associations index 955 detail
show security ipsec security-associations index 963 detail
show security ipsec security-associations index 969 detail
show security ipsec security-associations index 472 detail
show security ipsec security-associations index 961 detail
show security ipsec security-associations index 927 detail
show security ipsec security-associations index 913 detail
show security ipsec security-associations index 849 detail
show security ipsec security-associations index 959 detail
show security ipsec security-associations index 919 detail
show security ipsec security-associations index 925 detail
show security ipsec security-associations index 479 detail
show security ipsec security-associations index 847 detail
show security ipsec security-associations index 967 detail
show security ipsec security-associations index 981 detail
show security ipsec security-associations index 915 detail
show security ipsec security-associations index 857 detail
show security ipsec security-associations index 923 detail
show security ipsec security-associations index 965 detail
show security ipsec security-associations index 853 detail
show security ipsec security-associations index 973 detail
show security ipsec security-associations index 917 detail
show security ipsec security-associations index 987 detail
show security ipsec security-associations index 941 detail
show security ipsec security-associations index 1011 detail
show security ipsec security-associations index 1009 detail
show security ipsec security-associations index 991 detail
show security ipsec security-associations index 975 detail
show security ipsec security-associations index 855 detail
show security ipsec security-associations index 1005 detail

Awesome!

Basically, the command process is –

  • cat << EOF – Concatenate data into the cat buffer until you see ‘EOF’
  • sed ‘/>/d’ – Use Sed to remove any lines which start with a > character
  • awk ‘{print $1}’ – Use awk to print out the first column of the output (our IPSec SA ID)
  • sed ‘s/</security ipsec security-associations index /’ – Use sed to replace the < character with ‘show security ipsec security-associations index ‘
  • sed ‘s/$/ detail/’ – Use sed to add ‘ detail’ onto the end of each line.

Show IPsec Phase 2 Tunnels Based on VPN Name

Using the example above, here’s a similar process for getting the same output, but based on IPSec VPN name. Run ‘show configuration security ipsec | display set | match <value>’ to get the IPSec Phase 2 tunnel information. For example –

set security ipsec vpn SB-MG-ANTIVIR-234 ike gateway SB-MG-VPN
set security ipsec vpn SB-MG-ANTIVIR-234 ike ipsec-policy SB-MG-POLICY
set security ipsec vpn SB-MG-ANTIVIR-234 establish-tunnels immediately
set security ipsec vpn SB-MG-ANTIVIR-237 ike gateway SB-MG-VPN
set security ipsec vpn SB-MG-ANTIVIR-237 ike ipsec-policy SB-MG-POLICY
set security ipsec vpn SB-MG-ANTIVIR-237 establish-tunnels immediately
set security ipsec vpn SB-MG-P2PE-234 ike gateway SB-MG-VPN
set security ipsec vpn SB-MG-P2PE-234 ike ipsec-policy SB-MG-POLICY
set security ipsec vpn SB-MG-P2PE-234 establish-tunnels immediately
set security ipsec vpn SB-MG-P2PE-237 ike gateway SB-MG-VPN
set security ipsec vpn SB-MG-P2PE-237 ike ipsec-policy SB-MG-POLICY
set security ipsec vpn SB-MG-P2PE-237 establish-tunnels immediately
set security ipsec vpn SB-MG-APPL2-234 ike gateway SB-MG-VPN
set security ipsec vpn SB-MG-APPL2-234 ike ipsec-policy SB-MG-POLICY
set security ipsec vpn SB-MG-APPL2-234 establish-tunnels immediately
set security ipsec vpn SB-MG-APPL2-237 ike gateway SB-MG-VPN
set security ipsec vpn SB-MG-APPL2-237 ike ipsec-policy SB-MG-POLICY
set security ipsec vpn SB-MG-APPL2-237 establish-tunnels immediately
set security ipsec vpn SB-MG-WSUS-234 ike gateway SB-MG-VPN
set security ipsec vpn SB-MG-WSUS-234 ike ipsec-policy SB-MG-POLICY
set security ipsec vpn SB-MG-WSUS-234 establish-tunnels immediately
set security ipsec vpn SB-MG-WSUS-237 ike gateway SB-MG-VPN
set security ipsec vpn SB-MG-WSUS-237 ike ipsec-policy SB-MG-POLICY
set security ipsec vpn SB-MG-WSUS-237 establish-tunnels immediately
set security ipsec vpn SB-MG-TERMSERV-234 ike gateway SB-MG-VPN
set security ipsec vpn SB-MG-TERMSERV-234 ike ipsec-policy SB-MG-POLICY
set security ipsec vpn SB-MG-TERMSERV-234 establish-tunnels immediately
set security ipsec vpn SB-MG-TERMSERV-237 ike gateway SB-MG-VPN
set security ipsec vpn SB-MG-TERMSERV-237 ike ipsec-policy SB-MG-POLICY
set security ipsec vpn SB-MG-TERMSERV-237 establish-tunnels immediately
set security ipsec vpn SB-MG-DNS-234 ike gateway SB-MG-VPN
set security ipsec vpn SB-MG-DNS-234 ike ipsec-policy SB-MG-POLICY
set security ipsec vpn SB-MG-DNS-234 establish-tunnels immediately
set security ipsec vpn SB-MG-DNS-237 ike gateway SB-MG-VPN
set security ipsec vpn SB-MG-DNS-237 ike ipsec-policy SB-MG-POLICY
set security ipsec vpn SB-MG-DNS-237 establish-tunnels immediately

Here’s the command to filter that into a show command for the index value –

cat << EOF | grep "ipsec-policy" | sed 's/set/show/' | sed 's/vpn/security-associations vpn-name/' | awk '{print $1,$2,$3,$4,$5,$6}' | sed 's/$/ detail/'

The logic of the above command is based on the fact that every IPSec VPN tunnel will ALWAYS have an ‘ipsec-policy’ defined.

The output becomes –

show security ipsec security-associations vpn-name SB-MG-ANTIVIR-234 detail
show security ipsec security-associations vpn-name SB-MG-ANTIVIR-237 detail
show security ipsec security-associations vpn-name SB-MG-P2PE-234 detail
show security ipsec security-associations vpn-name SB-MG-P2PE-237 detail
show security ipsec security-associations vpn-name SB-MG-APPL2-234 detail
show security ipsec security-associations vpn-name SB-MG-APPL2-237 detail
show security ipsec security-associations vpn-name SB-MG-WSUS-234 detail
show security ipsec security-associations vpn-name SB-MG-WSUS-237 detail
show security ipsec security-associations vpn-name SB-MG-TERMSERV-234 detail
show security ipsec security-associations vpn-name SB-MG-TERMSERV-237 detail
show security ipsec security-associations vpn-name SB-MG-DNS-234 detail
show security ipsec security-associations vpn-name SB-MG-DNS-237 detail

Neat. I can’t tell you how many times those commands have saved me hours of tedious typing in a terminal!

Clearing IPSec Tunnels

Finally, here’s a last one which refreshes IPSec Phase 2 tunnels. Be careful with this, as it’s possible to do damage and interrupt tunnel traffic. Use the ‘show security ipsec security-associations | match <peer_ip>’ output to filter against the remote peer concerned.

cat << EOF | sed '/>/d' | awk '{print $1}' | sed 's/</clear security ipsec security-associations index /'

Enjoy a nice cuppa with the time saved :)
Juniper EX Switch GRE Tunnels

Juniper EX Switch GRE Tunnels

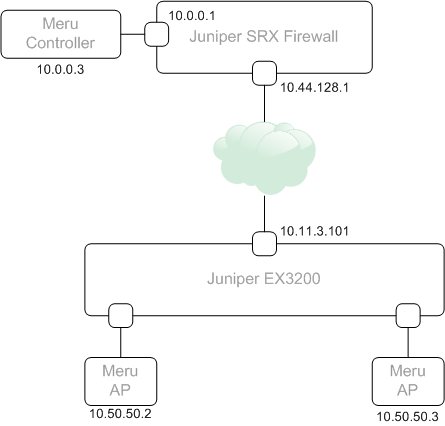
I recently had a need to establish a GRE tunnel between two sites. The reason being, we were deploying a Meru Wifi proof-of-concept where AP’s were on one site, and the controller on a remote site. Normally, the connectivity between AP’s the controller would go over the existing routed network (layer 3 mode in Meru-speak), but in this case, it wasn’t possible to get the new subnet assigned to the controller updated with the ISP providing the private links. As the customer was using Juniper EX switches and had a Juniper SRX firewall at the remote (controller) site, GRE allowed us to build the network without the need to involve the ISP.

The following topology was used –

EX_GRE_TOPOLOGY

GRE was added to the EX switch feature set in JunOS 12.1 (link here). In-order to use it, you need to allocate a physical port to be dedicated for tunnel services. For my example, I’ve used port ge-0/0/14 on the switch

set chassis fpc 0 pic 0 tunnel-port 14 tunnel-services

The JunOS 12.1 documentation above defines we allocate a port via it’s fpc and pic allocation. In my case, the switch was a single switch so the fpc was ‘0’. In a Virtual-Chassis environment, the fpc number would change. For example, if you wanted to use port 47 on switch 4, the command would be ‘set chassis fpc 4 pic 0 tunnel-port 47 tunnel-services’.

With the port allocated, we can then build the GRE configuration.

set interfaces gr-0/0/14 unit 0 tunnel source 10.11.3.101
set interfaces gr-0/0/14 unit 0 tunnel destination 10.44.128.1
set interfaces gr-0/0/14 unit 0 family inet address 10.11.12.1/24

On the SRX-side, the configuration is as follows.

set interfaces gr-0/0/0 unit 1 tunnel source 10.44.128.1
set interfaces gr-0/0/0 unit 1 tunnel destination 10.11.3.101
set interfaces gr-0/0/0 unit 1 family inet address 10.11.12.2/24

Each GRE interface has a tunnel source and destination set (this is the routed interface of the device at each end) and an inet address assigned to the interface which is used to establish the tunnel (10.11.12.1 and 10.11.12.2 in my case). I’ve used unit ‘1’ on my SRX, as I already have some GRE tunnels built to other destinations. A GRE interface uses the same unit assignment as a switch or inet port in JunOS, they can be used for different connection purposes.

GRE tunnels show ‘UP’ immediately, even if the configuration isn’t set correctly, so don’t assume as it’s UP, it’s going to work. Look closely at the Input/Output packet count to validate traffic flow.

Here’s the output of ‘show interfaces gr-0/0/14.0’ on the EX.

GRE-EX-INT

Now the output of ‘show interfaces gr-0/0/0.1’ on the SRX.

GRE-SRX-INT

Back on the EX switch, we set routing-options to send any 10.0.0.0/24 traffic through the GRE tunnel.

set routing-options static route 10.0.0.0/24 next-hop gr-0/0/14.0

On the SRX, we set the routing-options to send any 10.50.50.0/24 traffic in the same manner.

set routing-options static route 10.50.50.0/24 next-hop gr-0/0/0.1

As the SRX is a firewall, we need to perform some additional steps to allow traffic. This means creating a ‘zone’ to assign the GRE tunnel interface too, disabling any Network Address Translation rules, and some security policies to permit the traffic. Here’s what I’ve configured.

set security policies from-zone gretunnel to-zone trust policy allowall match source-address any
set security policies from-zone gretunnel to-zone trust policy allowall match destination-address any
set security policies from-zone gretunnel to-zone trust policy allowall match application any
set security policies from-zone gretunnel to-zone trust policy allowall then permit
set security policies from-zone trust to-zone gretunnel policy allowall match source-address any
set security policies from-zone trust to-zone gretunnel policy allowall match destination-address any
set security policies from-zone trust to-zone gretunnel policy allowall match application any
set security policies from-zone trust to-zone gretunnel policy allowall then permit
set security zones security-zone gretunnel host-inbound-traffic system-services ping
set security zones security-zone gretunnel host-inbound-traffic system-services traceroute
set security zones security-zone gretunnel interfaces gr-0/0/0.1
set security nat source rule-set trust-to-gre from zone trust
set security nat source rule-set trust-to-gre to zone gretunnel
set security nat source rule-set trust-to-gre rule source-nat-off match source-address 0.0.0.0/0
set security nat source rule-set trust-to-gre rule source-nat-off then source-nat off

Now we should be able to initiate a traceroute from the EX switch to our Meru Controller (10.0.0.3).

GRE-EX-TR

Looks good. We enter the GRE tunnel interface (10.11.12.2) and exit directly to the Meru Controller.

Dynamic Blocklist’s with JunOS

Dynamic Blocklist’s with JunOS

Doing policy based filtering on JunOS when the list of IP’s to control is large (many 100’s or 1000’s) can lead to unexpected results in policy processing. For example, a customer recently needed to restrict an external entity which had an IPSec tunnel to their HQ to a list of 200+ individual /32 IP addresses on their internal network. Doing it with policy against an IPSec tunnel on the SRX is possible, but the result was that it worked intermittently at best. I think the SRX (certainly the branch office models) don’t have the processing power for that many individual IP addresses in an ACL policy.

Instead of applying control at the policy layer, I configured stateless firewall filters to do the same thing. Processing it this way didn’t seem to add a huge load to the SRX so this got me to thinking about whether it’s possible to integrate a dynamic list such as the excellent Spamhaus DROP and EDROP block lists which are commonly used by ISP’s to protect users against attacks from known malicious networks, or those which have been hijacked. I also added the equally excellent DShield.org, Emerging Threats, and Team-Cymru lists.

The desired ruleset would look something like –

filter dropped {
       term dropped {
            from {
              address {
                 1.1.1.0/24
                 2.2.2.2/32
                 }
            then {
                 count dropped;
                 syslog;
                 discard;
            }
       }
       term default {
            then accept;
       }
}

In display set form, it looks as follows –

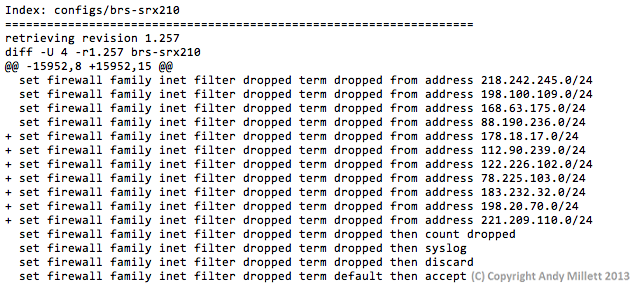
set firewall family inet filter dropped term dropped from address 1.1.1.1/24
set firewall family inet filter dropped term dropped from address 2.2.2.2/32
set firewall family inet filter dropped term dropped then count dropped
set firewall family inet filter dropped term dropped then syslog
set firewall family inet filter dropped term dropped then discard
set firewall family inet filter dropped term default then accept

Something like this has been done before. See the following link for information. The link defines using extra binary files on JunOS which I wasn’t comfortable doing, especially as the article was written in 2005, and updated in 2009 to mention that the binary files may no longer work in later versions of JunOS. What follows has been tested on JunOS 10.4 and 11.2.

DISCLAIMER – I MAKE NO GUARANTEES THAT THIS WILL WORK IN YOUR ENVIRONMENT, AND ASSUME NO RESPONSIBILITY FOR ANY ISSUES, DAMAGE OR LOSS OF SERVICE YOU ENCOUNTER IN USING THE SCRIPTS OR INSTRUCTIONS IN THIS ARTICLE.

Setting up the filter is relatively straight-forward. The problem is doing it in an automated manner. JunOS is based on FreeBSD, which is very useful as underneath the normal JunOS cli, you can run cron jobs.

First off, setup a user on your SRX or EX switch which can be used without a password login. I found the following article very useful in helping to set that bit up. As I’m using a remote Linux host to generate the file automatically which will then be sent to the SRX, I do all the work on the Linux host. We’ll get to that bit in a minute.

Once the user has been setup (I created username ‘cronadmin’ on my SRX), you can add the following script to the users home directory in the following steps.

Login as ‘cronadmin’ from the device which is going to send the files when they are updated.

Run the command

start shell

Now you are on the underlying BSD shell, you can use traditional Unix commands, like ‘vi’ to edit/create the file. Use ‘vi’ to create a file called ‘filterupdate.sh’ (e.g ‘vi filterupdate.sh’). If you need more help on how to use VI, see the following link. The file is used by cron on the SRX to load the updated ‘dropped.txt’ file into the existing configuration, after which it commits, then quits.

{
echo "configure"
echo "load replace dropped.txt"
echo "commit check"
echo "commit"
echo "exit"
} | /usr/sbin/cli

Once you have edited and closed the file, you can move to the next stage in the dynamic filter implementation.

We move over to the Linux host used to generate the file. On that host, we create two scripts (I put mine in /usr/local/bin). Run the command ‘chmod +x <scriptname>‘ against both files to make them executable.

1) etget.sh – which gets the files we need.

#!/bin/sh
/usr/bin/wget --user-agent="Mozilla/5.0 (Macintosh; Intel Mac OS X 10.7; rv:7.0.1) Gecko/20100101 Firefox/7.0.1" -N http://www.spamhaus.org/drop/drop.txt
/usr/bin/wget --user-agent="Mozilla/5.0 (Macintosh; Intel Mac OS X 10.7; rv:7.0.1) Gecko/20100101 Firefox/7.0.1" -N http://www.spamhaus.org/drop/edrop.txt
/usr/bin/wget --user-agent="Mozilla/5.0 (Macintosh; Intel Mac OS X 10.7; rv:7.0.1) Gecko/20100101 Firefox/7.0.1" -N http://www.dshield.org/block.txt
/usr/bin/wget --user-agent="Mozilla/5.0 (Macintosh; Intel Mac OS X 10.7; rv:7.0.1) Gecko/20100101 Firefox/7.0.1" -N http://www.team-cymru.org/Services/Bogons/fullbogons-ipv4.txt
/usr/bin/wget --user-agent="Mozilla/5.0 (Macintosh; Intel Mac OS X 10.7; rv:7.0.1) Gecko/20100101 Firefox/7.0.1" -N http://rules.emergingthreats.net/fwrules/emerging-IPTABLES-RBN.rules

2) et.sh which processes the files.

#!/bin/sh
UPDATE1="dropped.txt"
# START ECHOING SRX STANZA TERMS TO THE FILTER LIST FILE
echo "firewall {" > $UPDATE1
echo "family inet {" >> $UPDATE1
echo "replace:" >> $UPDATE1
echo "filter dropped {" >> $UPDATE1
echo " term dropped {" >> $UPDATE1
echo " from {" >> $UPDATE1
echo " address {" >> $UPDATE1
cat emerging-IPTABLES-RBN.rules | while read H 
do 
sed '/#/d' | sed '/^$/d' | grep "src" | awk '{print $7}' | sed 's/$/;/' >> $UPDATE1
done
cat drop.txt | while read H
do
sed '/^;/d' | awk '{print $1}' | sed 's/$/;/' >> $UPDATE1
done
cat edrop.txt | while read H
do 
sed '/^;/d' | awk '{print $1}' | sed 's/$/;/' >> $UPDATE1
done
cat block.txt | while read H
do
sed '/#/d' | sed '/Start/d' | sed '/^$/d' | sed '/127.0.0.0/d' | awk '{print $1}' | sed 's/$/\/24/' | sed 's/$/;/' >> $UPDATE1
done
cat fullbogons-ipv4.txt | while read H
do
sed '/#/d' | sed '/0.0.0.0/d' | sed '/172.0.0.0\/9/d' | sed '/172.16.0.0/d' | sed '/192.168.0.0/d' | sed '/224.0.0.0/d' | sed '/127.0.0.0/d' | sed 's/$/;/' >>$UPDATE1
done
echo "\n }" >> $UPDATE1
echo " } " >> $UPDATE1
echo " then { " >> $UPDATE1
echo " count dropped;" >> $UPDATE1
echo " syslog;" >> $UPDATE1
echo " discard; " >> $UPDATE1
echo " } " >> $UPDATE1
echo " term default {" >> $UPDATE1
echo " then accept;" >> $UPDATE1
echo " }" >> $UPDATE1
#
# COPY THE CREATED FILE ACROSS TO THE SRX
scp $UPDATE1 cronadmin@<SRX_IP_ADDRESS>:/cf/var/home/cronadmin

You’ll notice that the last command in the ‘et.sh’ file uses the Linux ‘scp’ command (Secure Copy). As it is called in a script, this is why we use an account which doesn’t require a password.

Once the scripts are configured, we can setup a cronjob on the Linux server which will generate and copy the file to the SRX – Run the command ‘crontab -e’. then insert the following entries.

00 1,3,5,7,9,11,13,15,17,19,21,23 * * * (cd /usr/local/bin; ./etget.sh)
5 1,3,5,7,9,11,13,15,17,19,21,23 * * * (cd /usr/local/bin; ./et.sh)

The above runs the ‘etget.sh’ every two hours, on the hour, and ‘et.sh’ at every two hours, and 5 minutes past the hour.

Now go back to your SRX, and login as the ‘cronadmin’ user and start the shell.

root@debian:/usr/local/bin# ssh cronadmin@srx
--- JUNOS 10.4R14.2 built 2013-05-03 06:11:23 UTC
cronadmin@SRX210> start shell 
%

Now execute the command ‘crontab -e’ and paste in the following –

15      1,3,5,7,9,11,13,15,17,19,21,23  *       *       *       (cd /cf/var/home/cronadmin; sh /filterupdate.sh)

This sets the SRX to run the cronjob every two hours, at 15 minutes past the hour. On the SRX, the default crontab editor is ‘VI’ so refer to the link previously in this article in order to become familiar with ‘vi’.

Finally, in order to make the filter active, it has to be applied to an interface.

fe-0/0/7 {
     unit 0 {
            family inet {
                      filter {
                           input dropped;
                      }
                      address 172.16.111.111/24;
            }
       }
}

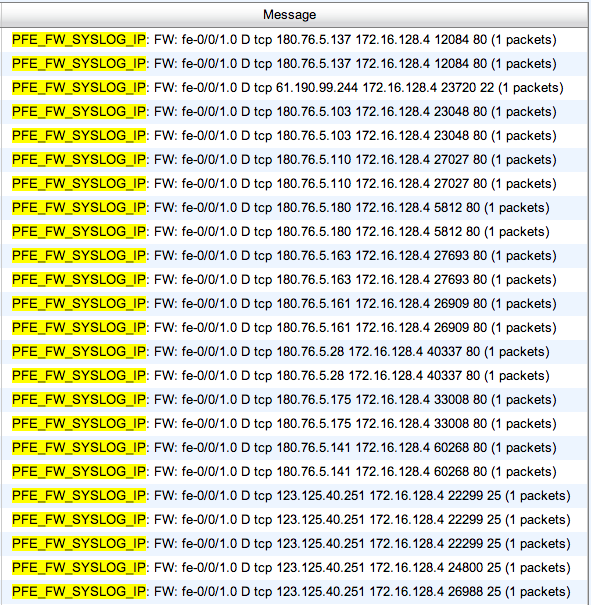
With this all done, any addresses matching the filter should now be dropped –

SRX-DROPPED

The script files I used can be downloaded using the following links –

et.txt
etget.txt
filterupdate.txt

UPDATE 21/07/13

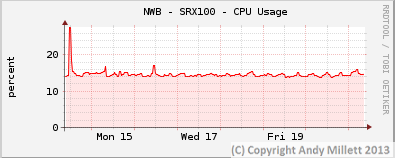
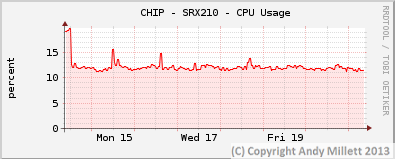
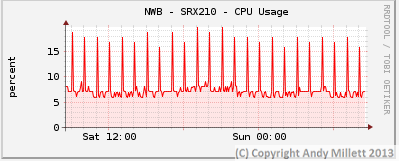
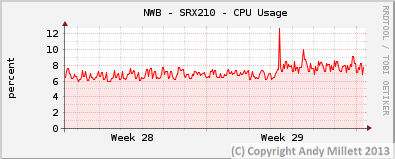
Since configuring the filters and publishing this article, I’ve been monitoring the CPU/Memory use of the SRX devices I have the filter applied too, just in-case there may have been an adverse affect on system load. I have it configured on three SRX’s, two don’t use the Juniper IDS engine, one does.

On the non-IDS SRX’s, CPU and memory use hasn’t been adversely effected (NWB – SRX100, CHIP – SRX210). On the SRX which uses IDS (NWB -SRX210), there’s a slight increase on CPU usage when the device applies the updates but it seems to return to normal once the update has been applied.

Non-IDS

NWB100-WEEK

CHIP-WEEK

IDS

NWB-DAY


NWB-WEEK

UPDATE 29/07/2013

One additional update concerning the script which runs on the SRX itself. I’ve discovered that the cron entry on the SRX doesn’t actually fire the script off. We use RANCID to monitor configuration changes on our JunOS devices, and I realised something was up when I wasn’t getting configuration change alerts from RANCID which would indicate the ‘dropped’ firewall filter was being updated.

As a consequence, the crontab entry has changed from this –

15      1,3,5,7,9,11,13,15,17,19,21,23  *       *       *       (cd /cf/var/home/cronadmin; ./filterupdate.sh)

To this –

15      1,3,5,7,9,11,13,15,17,19,21,23  *       *       *       (cd /cf/var/home/cronadmin; sh filterupdate.sh)

RANCID is now logging updates –

RANCID-UPDATE

I’ve also modified the etget.sh script. All files are downloaded using wget -N now. The reason being, this is less demanding on the blocklists I use as it only downloads the file if it has changed (the ‘-N’ switch).

The new script looks like –

#!/bin/sh
/usr/bin/wget --user-agent="Mozilla/5.0 (Macintosh; Intel Mac OS X 10.7; rv:7.0.1) Gecko/20100101 Firefox/7.0.1" -N http://www.spamhaus.org/drop/drop.txt
/usr/bin/wget --user-agent="Mozilla/5.0 (Macintosh; Intel Mac OS X 10.7; rv:7.0.1) Gecko/20100101 Firefox/7.0.1" -N http://www.spamhaus.org/drop/edrop.txt
/usr/bin/wget --user-agent="Mozilla/5.0 (Macintosh; Intel Mac OS X 10.7; rv:7.0.1) Gecko/20100101 Firefox/7.0.1" -N http://www.dshield.org/block.txt
/usr/bin/wget --user-agent="Mozilla/5.0 (Macintosh; Intel Mac OS X 10.7; rv:7.0.1) Gecko/20100101 Firefox/7.0.1" -N http://www.team-cymru.org/Services/Bogons/fullbogons-ipv4.txt
/usr/bin/wget --user-agent="Mozilla/5.0 (Macintosh; Intel Mac OS X 10.7; rv:7.0.1) Gecko/20100101 Firefox/7.0.1" -N http://rules.emergingthreats.net/fwrules/emerging-IPTABLES-RBN.rules

These changes have been applied to the script links above.

 UPDATE 04/09/2013

Since applying the dynamic lists to my SRX’s, I’ve been monitoring it’s progress on and off. All seems to be well with the scripts; RANCID is logging the changes, and the firewall filter output is showing dropped packets when I check manually. CPU and Memory use are still pretty stable, although it does take an extra few seconds (on the Branch SRX anyway), to apply changes.

The filter has an action of ‘syslog’. set against the ‘then’ clause, so I thought it would be useful to post what that does at the syslog end. I use ELSA to log traffic I’m interested in for later parsing when I think there may be a problem. The ELSA database has shown there’s actually quite a lot of traffic logged against these dynamic blocklists. Searching the database for ‘PFE_FW_SYSLOG_IP’ which is the field entry the SRX uses to send anything matching the firewall filter when the ‘syslog’ action is set.

ELSE-SYSLOG

There’s quite a mix of dport types there, mostly well-known ports though (HTTP, HTTPS, SMTP and SSH).

UPDATE 08/12/2013

The script has been working well for over 6 months now, however after a short time, I was curious in seeing which lists the filter was matching against. As a consequence, I rewrote the et.sh script to split the various blocklists into individual terms. Here’s the new et.sh script –

#!/bin/sh
UPDATE1="dropped.txt"
# START ECHOING SRX STANZA TERMS TO THE FILTER LIST FILE
echo "firewall {" > $UPDATE1
echo "family inet {" >> $UPDATE1
echo "replace:" >> $UPDATE1
echo "filter dropped {" >> $UPDATE1
echo " term emergingcc {" >> $UPDATE1
echo " from {" >> $UPDATE1
echo " address {" >> $UPDATE1
cat emerging-IPTABLES-CC.rules | while read H 
do 
sed '/#/d' | sed '/^$/d' | grep "src" | awk '{print $7}' | sed 's/$/;/' >> $UPDATE1
done
echo "\n }" >> $UPDATE1
echo " } " >> $UPDATE1
echo " then { " >> $UPDATE1
echo " count emergingcc-dropped;" >> $UPDATE1
echo " syslog;" >> $UPDATE1
echo " discard; " >> $UPDATE1
echo " } " >> $UPDATE1
echo " term emergingrbn {" >> $UPDATE1
echo " from {" >> $UPDATE1
echo " address {" >> $UPDATE1
cat emerging-IPTABLES-RBN.rules | while read H 
do 
sed '/#/d' | sed '/^$/d' | grep "src" | awk '{print $7}' | sed 's/$/;/' >> $UPDATE1
done
echo "\n }" >> $UPDATE1
echo " } " >> $UPDATE1
echo " then { " >> $UPDATE1
echo " count emergingrbn-dropped;" >> $UPDATE1
echo " syslog;" >> $UPDATE1
echo " discard; " >> $UPDATE1
echo " } " >> $UPDATE1
echo " term spamhaus-drop {" >> $UPDATE1
echo " from {" >> $UPDATE1
echo " address {" >> $UPDATE1
cat drop.txt | while read H
do
sed '/^;/d' | awk '{print $1}' | sed 's/$/;/' >> $UPDATE1
done
echo "\n }" >> $UPDATE1
echo " } " >> $UPDATE1
echo " then { " >> $UPDATE1
echo " count spamhaus-drop;" >> $UPDATE1
echo " syslog;" >> $UPDATE1
echo " discard; " >> $UPDATE1
echo " } " >> $UPDATE1
echo " term spamhaus-edrop {" >> $UPDATE1
echo " from {" >> $UPDATE1
echo " address {" >> $UPDATE1
cat edrop.txt | while read H
do 
sed '/^;/d' | awk '{print $1}' | sed 's/$/;/' >> $UPDATE1
done
echo "\n }" >> $UPDATE1
echo " } " >> $UPDATE1
echo " then { " >> $UPDATE1
echo " count spamhaus-edrop;" >> $UPDATE1
echo " syslog;" >> $UPDATE1
echo " discard; " >> $UPDATE1
echo " } " >> $UPDATE1
echo " term dshield-block {" >> $UPDATE1
echo " from {" >> $UPDATE1
echo " address {" >> $UPDATE1
cat block.txt | while read H
do
sed '/#/d' | sed '/Start/d' | sed '/^$/d' | sed '/127.0.0.0/d' | awk '{print $1}' | sed 's/$/\/24/' | sed 's/$/;/' >> $UPDATE1
done
echo "\n }" >> $UPDATE1
echo " } " >> $UPDATE1
echo " then { " >> $UPDATE1
echo " count dshield-block;" >> $UPDATE1
echo " syslog;" >> $UPDATE1
echo " discard; " >> $UPDATE1
echo " } " >> $UPDATE1
echo " term team-cymru {" >> $UPDATE1
echo " from {" >> $UPDATE1
echo " address {" >> $UPDATE1
cat fullbogons-ipv4.txt | while read H
do
sed '/#/d' | sed '/0.0.0.0/d' | sed '/172.0.0.0\/9/d' | sed '/172.16.0.0/d' | sed '/192.168.0.0/d' | sed '/224.0.0.0/d' | sed '/127.0.0.0/d' | sed 's/$/;/' >> $UPDATE1
done
echo "\n }" >> $UPDATE1
echo " } " >> $UPDATE1
echo " then { " >> $UPDATE1
echo " count blocked-bogons;" >> $UPDATE1
echo " syslog;" >> $UPDATE1
echo " discard; " >> $UPDATE1
echo " } " >> $UPDATE1
echo " term collective-intel {" >> $UPDATE1
echo " from {" >> $UPDATE1
echo " address {" >> $UPDATE1
cat ci-badguys.txt | while read H
do
sed 's/$/;/' >> $UPDATE1
done
echo "\n }" >> $UPDATE1
echo " } " >> $UPDATE1
echo " then { " >> $UPDATE1
echo " count ciarmy-dropped;" >> $UPDATE1
echo " syslog;" >> $UPDATE1
echo " discard; " >> $UPDATE1
echo " } " >> $UPDATE1
echo " term default {" >> $UPDATE1
echo " then accept;" >> $UPDATE1
echo " }" >> $UPDATE1
#
# COPY THE CREATED FILE ACROSS TO THE SRX
scp $UPDATE1 cronadmin@<SRX_IP_ADDRESS>:/cf/var/home/cronadmin

Example copies of the script can be found under the following links –

et.txt
etget.txt

Now I can see which are matching.

SRX-DROPPED-PER-TERM

Adding in new terms for your own purposes is actually quite easy once the basic file structure is setup using et.txt. Simply copy an existing ‘term’, then paste in and the relevant location you want it to match.

For example, yesterday I added the Collective Intelligence blocklists provided by the nice folks over at SentinalIPS.

echo " term collective-intel {" >> $UPDATE1
echo " from {" >> $UPDATE1
echo " address {" >> $UPDATE1
cat ci-badguys.txt | while read H
do
sed 's/$/;/' >> $UPDATE1
done
echo "\n }" >> $UPDATE1
echo " } " >> $UPDATE1
echo " then { " >> $UPDATE1
echo " count ciarmy-dropped;" >> $UPDATE1
echo " syslog;" >> $UPDATE1
echo " discard; " >> $UPDATE1
echo " } " >> $UPDATE1

UPDATE 30/01/2014

I had an issue recently with my dynamic blocklist implementation, the issue was quite a biggie, as it took out my connections for a short period, including the normal SSH/HTTP access. Not good.

Luckily, I have alternate access to the SRX devices on an interface which the filter doesn’t run on, so I was able to get in and determine what had gone wrong. To cut a long story short, the issue related to one of the dynamic blocklists I use not returning the content expected, so the multiple sed, awk and other commands I use to filter the text files failed to pickup a suitable list of IP addresses which needed to be added and basically left the filter looking like this –

andy@NWB-SRX100> show configuration firewall family inet filter dropped term t1 
from {
 address {
}
}
then {
 count block;
 syslog;
 discard;
}

If you use firewall filters regularly in JunOS, you’ll see the problem immediately. If you don’t, I’ll explain; the ‘from’ ‘address’ part of the term has no matching addresses, so basically it’s saying ‘match any address’. The ‘then’ part of the term has an action of ‘discard’. Oh dear, that’s just not good at all. This is why the firewall started dropping connections.

So, having learned my lesson, I’ve rewritten the script. Instead of trusting that the excellent blacklist providers will give me the data format I need, I now check that the data can be manipulated in the way I need before writing it to an update file which the SRX ‘load replace’s’.  Using an if-statement (if [ -z <string>] meaning true if the string is empty), the script inserts, or doesn’t insert the updated statement to the blocklist update. Using the awesome DShield block list as an example –

DSTEST=`cat block.txt | sed '/#/d' | sed '/Start/d' | sed '/^$/d' | awk '{print $1}'`
if [ -z "$DSTEST" ] ; then
echo "No Output for DShield"
else
echo "Looks good for DShield"
echo " term dshield-dropped {" >> $UPDATE
echo " from {" >> $UPDATE
echo " address {" >> $UPDATE
cat block.txt | while read H
do
sed '/#/d' | sed '/Start/d' | sed '/^$/d' | awk '{print $1}' | sed 's/$/\/24/' | sed 's/$/;/' >> $UPDATE
done
echo " }" >> $UPDATE
echo " } " >> $UPDATE
echo " then { " >> $UPDATE
echo " count dshield-dropped;" >> $UPDATE
echo " syslog;" >> $UPDATE
echo " discard; " >> $UPDATE
echo " } " >> $UPDATE
fi

DSTEST=`cat block.txt | sed ‘/#/d’ | sed ‘/Start/d’ | sed ‘/^$/d’ | awk ‘{print $1}’` is the output to check for.

So the if statement goes –

if [ -z “$DSTEST” ] ; then
# Nothing is outputted, do nothing else. 
echo “No output from DShield”
else
# Something is outputted, write the term. 
echo “Looks good from DShield”
fi

Normally, the Dshield block list looks like this –

# 
# DShield.org Recommended Block List 
# (c) 2007 DShield.org
# some rights reserved. Details http://creativecommons.org/licenses/by-nc-sa/2.5/
# use on your own risk. No warranties implied.
# primary URL: http://feeds.dshield.org/block.txt
# PGP Sign.: http://feeds.dshield.org/block.txt.asc
#
# comments: info@dshield.org
# updated: Thu Jan 30 20:53:15 2014 UTC
# 
# This list summarizes the top 20 attacking class C (/24) subnets
# over the last three days. The number of 'attacks' indicates the 
# number of targets reporting scans from this subnet.
#
#
# Columns (tab delimited):
#
# (1) start of netblock 
# (2) end of netblock
# (3) subnet (/24 for class C)
# (4) number of targets scanned
# (5) name of Network 
# (6) Country
# (7) contact email address
#
# If a range is assigned to multiple users, the first one is listed. 
# 
Start End Netblock Attacks Name Country email
187.33.1.0 187.33.1.255 24 4094 
212.175.155.0 212.175.155.255 24 2043 TR ipg@telekom.gov.tr
222.186.62.0 222.186.62.255 24 1821 
218.2.22.0 218.2.22.255 24 1788 CHINANET jiangsu province huaian city network CN abuse@pub.hy.jsinfo.net
61.174.51.0 61.174.51.255 24 1405 Chinanet CN antispam@dcb.hz.zj.cn
195.178.109.0 195.178.109.255 24 1335 PROVIDER RU [no email]
61.147.70.0 61.147.70.255 24 1211 CHINANET-BACKBONE No.31,Jin-rong Street CN abuse@jsinfo.net
194.106.140.0 194.106.140.255 24 1091 
62.193.234.0 62.193.234.255 24 1021 AMENAMENDEDICATED FR abuse@amen.fr
88.198.228.0 88.198.228.255 24 1010 
41.86.112.0 41.86.112.255 24 1003 
124.193.109.0 124.193.109.255 24 980 DXTNET Beijing Dian-Xin-Tong Network Technologies Co., Ltd. CN liudonghai@btte.net
213.80.171.0 213.80.171.255 24 961 
67.161.31.0 67.161.31.255 24 939 ComcastCableCommunications,IPServices US abuse@comcast.net
81.17.24.0 81.17.24.255 24 855 RELIANS Autonomous System RU james@priivatelayer.com.pa
62.28.131.0 62.28.131.255 24 761 
218.242.101.0 218.242.101.255 24 715 CN ipas@cnnic.cn
195.154.75.0 195.154.75.255 24 535 Cable&Wireless France FR dponzone@isdnet.net
80.82.70.0 80.82.70.255 24 435 
46.163.108.0 46.163.108.255 24 384 
#
#
# END
#
# finished list generation: Thu Jan 30 20:53:15 2014 UTC

The script changes I’ve implemented deem that if it looks like the following, the et.sh script will not insert the dshield term into the next update script –

# 
# DShield.org Recommended Block List 
# (c) 2007 DShield.org
# some rights reserved. Details http://creativecommons.org/licenses/by-nc-sa/2.5/
# use on your own risk. No warranties implied.
# primary URL: http://feeds.dshield.org/block.txt
# PGP Sign.: http://feeds.dshield.org/block.txt.asc
#
# comments: info@dshield.org
# updated: Thu Jan 30 20:53:15 2014 UTC
# 
# This list summarizes the top 20 attacking class C (/24) subnets
# over the last three days. The number of 'attacks' indicates the 
# number of targets reporting scans from this subnet.
#
#
# Columns (tab delimited):
#
# (1) start of netblock 
# (2) end of netblock
# (3) subnet (/24 for class C)
# (4) number of targets scanned
# (5) name of Network 
# (6) Country
# (7) contact email address
#
# If a range is assigned to multiple users, the first one is listed. 
# 
Start End Netblock Attacks Name Country email
#
#
# END
#
# finished list generation: Thu Jan 30 20:53:15 2014 UTC

If the script doesn’t find the output it needs, it will display the following and write nothing to the update.

No output from DShield

I’m should point out, I’m not saying the DShield block list was at fault on that fateful day, it’s simply an example to demonstrate the logic which has been added to mitigate unfortunate, or embarrassing outages.

The updated script can be found here

Doing these checks means that the script can be left to run in an automatic manner, and will take its own action if there’s something unexpected. You can, of course, amend the script to email you when it updates, so you can see whether there’s a problem downloading or processing the blacklists.


Transparent Proxy Redirection with JunOS

Transparent Proxy Redirection with JunOS

I have to say, I love proxy servers. Transparent proxy is my preference. Of all the Proxy servers in the world, the best in my opinion is Blue Coat’s ProxySG appliance. With the Blue Coat ProxySG as your proxy in transparent mode, this allows us to inspect content, without the need for user input, and to direct the traffic to a proxy so you get all the benefits of Web Pulse, Web Filter, ProxyAV, Wan Optimisation and Flash Caching. Plus the use of CPL (Content Policy Language) to decide whether users should be allowed access to a site or not. With transparent proxy that responsibility is dealt with by the network, and quite right too. There are some applications which don’t, however, respond well to transparent proxy, especially those which don’t understand authentication (are you reading this Google, Apple and Adobe!!!) so they have to be handled on the ProxySG with some custom CPL, however these little issues shouldn’t’ stop you considering transparent proxy as an option if you are planning a Blue Coat deployment or any other proxy which supports transparent redirect.

As both EX and SRX use JunOS, the implementation on each is exactly the same and this is one of the great reasons to love JunOS. In order to do WCCP-like transparent redirect on EX switches or SRX firewalls, there are several configuration items to consider:

  • The Filter Based Forwarding entry
  • A Virtual Routing Instance
  • A RIB group entry to combine the routing-instances
  • Some failover monitoring in-case the proxy fails such as an RPM probe with Event Monitoring

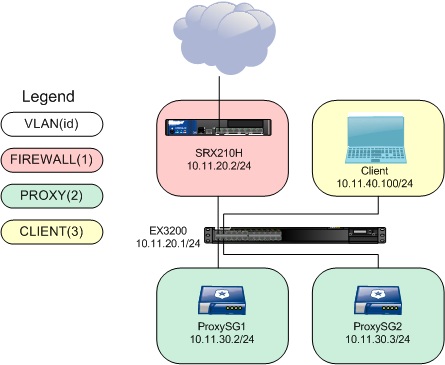
In the PoC lab, the following subnets/VLANs were used:

  • VLAN1 – 10.11.20.0/24 – Egress route subnet (an SRX firewall is connected and the EX switch has a default route to it)
  • VLAN2 – 10.11.30.0/24 – Proxy subnet used for the routing-instance configuration. PROXYSG ip is 10.11.30.2. PROXYSG2 ip is 10.11.30.3
  • VLAN3 – 10.11.40.0/24 – Client subnet


Transparent_HTTP_with_EX


First off, we setup a firewall filter to assign to an interface. The interface can be either family inet interface, or a virtual (VLAN) interface. This filter redirects anything from source subnet 10.11.40.0/24 (the client subnet) destined for anywhere on port 80, 443 or 21 to the proxy on routing-instance ‘PROXYSG’.

family inet {
filter proxysg-fbf {
term t1 {
from {
source-address {
10.11.40.0/24;
}
destination-address {
0.0.0.0/0;
}
destination-port [ http ftp https ];
}
then {
count redirected;
routing-instance PROXYSG;
}
}

In display set form, that looks like;

set firewall family inet filter proxysg-fbf term t1 from source-address 10.11.40.0/24
set firewall family inet filter proxysg-fbf term t1 from destination-address 0.0.0.0/0
set firewall family inet filter proxysg-fbf term t1 from destination-port http
set firewall family inet filter proxysg-fbf term t1 from destination-port ftp
set firewall family inet filter proxysg-fbf term t1 from destination-port https
set firewall family inet filter proxysg-fbf term t1 then count redirected
set firewall family inet filter proxysg-fbf term t1 then routing-instance PROXYSG
set firewall family inet filter proxysg-fbf term default then accept

Next, we need to have some way of redirecting the traffic ‘off-path’ to the proxy server. This is handled by a routing-instance, in this case to proxy server 10.11.30.2.

PROXYSG {
instance-type virtual-router;
routing-options {
static {
route 0.0.0.0/0 {
qualified-next-hop 10.11.30.2 {
metric 5;
}
}
}
}
}
set routing-instances PROXYSG instance-type virtual-router
set routing-instances PROXYSG routing-options static route 0.0.0.0/0 qualified-next-hop 10.11.30.2 metric 5
set routing-instances PROXYSG routing-options static route 0.0.0.0/0 qualified-next-hop 10.11.20.2 metric 20

Next, in order to combine the two routing-instances, we create a rib-group entry.

interface-routes {
rib-group inet PROXYSG;
}
static {
route 0.0.0.0/0 next-hop 10.11.20.2;
}
rib-groups {
PROXYSG {
import-rib [ inet.0 PROXYSG.inet.0 ];
}
}
set routing-options interface-routes rib-group inet PROXYSG
set routing-options static route 0.0.0.0/0 next-hop 10.11.20.2
set routing-options rib-groups PROXYSG import-rib inet.0
set routing-options rib-groups PROXYSG import-rib PROXYSG.inet.0

Finally, the filter we created earlier is assigned to an interface, in this case, the ingress interface which client traffic appears from.

vlan {
unit 3 {
family inet {
filter {
input proxysg-fbf;
}
address 10.11.40.1/24;
}
}
}

In order to have some failover capabilities, were the proxy to fail, we can use event monitoring probes on the EX switch to force a configuration change on the forwarding filter in the event the proxy fails. This is done using a custom monitoring script which was originally designed for use with Juniper WXC appliances.

The WXC-Healthcheck.slax file can be downloaded from here

The script should be uploaded to the EX switch using FTP or SCP and placed into /config/db/scripts/event/ (or whichever is relevant to the JunOS version you are running – tested on 11.4R2.14). Once loaded, you can create the RPM probe and event policy actions.

The event probe is setup as follows under the ‘services’ stanza within the configuration.

rpm {
probe proxysg {
test proxy-ping {
probe-type icmp-ping;
target address 10.11.30.2;
probe-count 3;
probe-interval 1;
test-interval 10;
thresholds {
total-loss 1;
}
}
}
set services rpm probe proxysg test proxy-ping probe-type icmp-ping
set services rpm probe proxysg test proxy-ping target address 10.11.30.2
set services rpm probe proxysg test proxy-ping probe-count 3
set services rpm probe proxysg test proxy-ping probe-interval 1
set services rpm probe proxysg test proxy-ping test-interval 10
set services rpm probe proxysg test proxy-ping thresholds total-loss 1

This will log either ‘PING_TEST_COMPLETED’ or ‘PING_TEST_FAILED’ in the ‘messages’ log on the switch.

Next, we create the event-options section to tell the switch what to do in the event of it seeing the ‘PING_TEST_COMPLETED’ or ‘PING_TEST_FAILED’ in the messages system log. The following two configuration options show what the EX switch will do in the event of each.

* In the event of a failure, disable the firewall filter.

policy rpm_down {
events PING_TEST_FAILED;
within 10 {
trigger on 1;
}
attributes-match {
PING_TEST_FAILED.test-owner matches "^proxysg$";
PING_TEST_FAILED.test-name matches "^proxy-ping$";
}
then {
event-script WXC-Healthcheck.slax {
arguments {
filter proxysg-fbf;
term t1;
action inactive;
}
}
}
}

* When the failure is fixed, re-enable the filter.

policy rpm_up {
events PING_TEST_COMPLETED;
within 20 {
trigger on 1;
}
attributes-match {
PING_TEST_COMPLETED.test-owner matches "^proxysg$";
PING_TEST_COMPLETED.test-name matches "^proxy-ping$";
}
then {
event-script WXC-Healthcheck.slax {
arguments {
filter proxysg-fbf;
term t1;
action active;
}
}
}
}
event-script {
file WXC-Healthcheck.slax;
}
traceoptions {
file wxc.out;
}

In display set for, that looks like;

set event-options policy rpm_down events PING_TEST_FAILED
set event-options policy rpm_down within 10 trigger on
set event-options policy rpm_down within 10 trigger 1
set event-options policy rpm_down attributes-match PING_TEST_FAILED.test-owner matches "^proxysg$"
set event-options policy rpm_down attributes-match PING_TEST_FAILED.test-name matches "^proxy-ping$"
set event-options policy rpm_down then event-script WXC-Healthcheck.slax arguments filter proxysg-fbf
set event-options policy rpm_down then event-script WXC-Healthcheck.slax arguments term t1
set event-options policy rpm_down then event-script WXC-Healthcheck.slax arguments action inactive
set event-options policy rpm_up events PING_TEST_COMPLETED
set event-options policy rpm_up within 20 trigger on
set event-options policy rpm_up within 20 trigger 1
set event-options policy rpm_up attributes-match PING_TEST_COMPLETED.test-owner matches "^proxysg$"
set event-options policy rpm_up attributes-match PING_TEST_COMPLETED.test-name matches "^proxy-ping$"
set event-options policy rpm_up then event-script WXC-Healthcheck.slax arguments filter proxysg-fbf
set event-options policy rpm_up then event-script WXC-Healthcheck.slax arguments term t1
set event-options policy rpm_up then event-script WXC-Healthcheck.slax arguments action active
set event-options event-script file WXC-Healthcheck.slax
set event-options traceoptions file wxc.out

If the proxy fails, the EX switch ‘event-options’ setting will see and act upon the following message log entry;

Apr 16 08:14:06 rmopd[992]: PING_TEST_FAILED: pingCtlOwnerIndex = proxysg, pingCtlTestName = proxy-ping

Every 20 seconds, it will re-check the message log, looking for the fail or success. If it sees a PING_TEST_COMPLETED, it will re-enable the filter.

Apr 16 08:21:13 rmopd[992]: PING_TEST_COMPLETED: pingCtlOwnerIndex = proxysg, pingCtlTestName = proxy-ping

You can view the filter counters to see traffic being redirected as we added a counter to the firewall filter term.

root> show firewall filter proxysg-fbf
Filter: proxysg-fbf
Counters:
Name Bytes Packets
redirected 68424 479

FAILOVER TO A SECOND PROXY
You can add failover to a second proxy by adding a second routing-instance and firewall filter term quite easily in order to ensure that traffic is always proxied (thus, your corporate AUP is always enforced).

For example, here term t2 is added after term t1 on the forwarding filter –

filter proxysg-fbf {
term t1 {
from {
source-address {
10.11.40.0/24;
}
destination-address {
0.0.0.0/0;
}
destination-port [ http ftp https ];
}
then {
count redirected;
routing-instance PROXYSG;
}
}
term t2 {
from {
source-address {
10.11.40.0/24;
}
destination-address {
0.0.0.0/0;
}
destination-port [ http ftp https ];
}
then {
count redirected2;
routing-instance PROXYSG2;
}
}
term default {
then accept;
}
}

The new routing instance looks like the following –

PROXYSG2 {
instance-type virtual-router;
routing-options {
static {
route 0.0.0.0/0 {
qualified-next-hop 10.11.30.3 {
metric 5;
}
qualified-next-hop 10.11.20.2 {
metric 20;
}
}
}
}
}

The RIB group is amended to add the second PROXYSG2 routing-instance.

rib-groups {
PROXYSG {
import-rib [ inet.0 PROXYSG.inet.0 PROXYSG2.inet.0 ];
}
}

Once this is done, the EX switch will continue to monitor the PROXYSG ip (10.11.30.2) and set it as inactive should it fail. If it does, the second term of the firewall filter (term t2) will become active.

family inet {
filter proxysg-fbf {
inactive: term t1 { <<<<<<<<<<<<<<<<<<<<<<<<<<<
from {
source-address {
10.11.40.0/24;
}
destination-address {
0.0.0.0/0;
}
destination-port [ http ftp https ];
}
then {
count redirected;
routing-instance PROXYSG;
}
}
term t2 {
from {
source-address {
10.11.40.0/24;
}
destination-address {
0.0.0.0/0;
}
destination-port [ http ftp https ];
}
then {
count redirected2;
routing-instance PROXYSG2;
}
}
term default {
then accept;
}
}
}

You can, of course, setup a second event-option monitor to monitor the second PROXYSG2 proxy (10.11.30.3) so that it also is set as inactive were the proxy to fail.

Conclusion
So there it is, transparent redirect in a WCCP-like manner using JunOS. The implementation above has worked on both a test EX switch and an SRX. I’m still working on whether we can emulate the load-balancing functions available from WCCP, via JunOS but for now the above configuration would certainly give you failover if you were to have two proxies.

REFERENCES
WXC-Filter-Based-Forwarding

FULL SWITCH CONFIG

set version 11.4R2.14
set system root-authentication encrypted-password "REMOVED"
set system name-server 208.67.222.222
set system scripts op traceoptions file wxc.out
set system scripts op file WXC-Healthcheck.slax
set system services ssh protocol-version v2
set system syslog user * any emergency
set system syslog file messages any any
set system syslog file messages authorization info
set system syslog file interactive-commands interactive-commands any
set system ntp server 194.164.127.6
set interfaces ge-0/0/0 description EXTERNAL_INTERFACE
set interfaces ge-0/0/0 unit 0 family ethernet-switching port-mode access
set interfaces ge-0/0/0 unit 0 family ethernet-switching vlan members VLAN1
set interfaces ge-0/0/1 description INTERNAL_PROXY_INTERFACE
set interfaces ge-0/0/1 unit 0 family ethernet-switching port-mode access
set interfaces ge-0/0/1 unit 0 family ethernet-switching vlan members VLAN2
set interfaces ge-0/0/2 description INTERNAL_CLIENT_INTERFACE
set interfaces ge-0/0/2 unit 0 family ethernet-switching port-mode access
set interfaces ge-0/0/2 unit 0 family ethernet-switching vlan members VLAN3
set interfaces ge-0/0/3 description INTERNAL_PROXY2_INTERFACE
set interfaces ge-0/0/3 unit 0 family ethernet-switching port-mode access
set interfaces ge-0/0/3 unit 0 family ethernet-switching vlan members VLAN2
set interfaces ge-0/0/4 unit 0 family ethernet-switching
set interfaces ge-0/0/5 unit 0 family ethernet-switching
set interfaces ge-0/0/6 unit 0 family ethernet-switching
set interfaces ge-0/0/7 unit 0 family ethernet-switching
set interfaces ge-0/0/8 unit 0 family ethernet-switching
set interfaces ge-0/0/9 unit 0 family ethernet-switching
set interfaces ge-0/0/10 unit 0 family ethernet-switching
set interfaces ge-0/0/11 unit 0 family ethernet-switching
set interfaces ge-0/0/12 unit 0 family ethernet-switching
set interfaces ge-0/0/13 unit 0 family ethernet-switching
set interfaces ge-0/0/14 unit 0 family ethernet-switching
set interfaces ge-0/0/15 unit 0 family ethernet-switching
set interfaces ge-0/0/16 unit 0 family ethernet-switching
set interfaces ge-0/0/17 unit 0 family ethernet-switching
set interfaces ge-0/0/18 unit 0 family ethernet-switching
set interfaces ge-0/0/19 unit 0 family ethernet-switching
set interfaces ge-0/0/20 unit 0 family ethernet-switching
set interfaces ge-0/0/21 unit 0 family ethernet-switching
set interfaces ge-0/0/22 unit 0 family ethernet-switching
set interfaces ge-0/0/23 unit 0 family ethernet-switching
set interfaces ge-0/1/0 unit 0 family ethernet-switching
set interfaces xe-0/1/0 unit 0 family ethernet-switching
set interfaces ge-0/1/1 unit 0 family ethernet-switching
set interfaces xe-0/1/1 unit 0 family ethernet-switching
set interfaces ge-0/1/2 unit 0 family ethernet-switching
set interfaces ge-0/1/3 unit 0 family ethernet-switching
set interfaces me0 unit 0 family inet
set interfaces vlan unit 0 family inet
set interfaces vlan unit 1 family inet address 10.11.20.1/24
set interfaces vlan unit 2 family inet address 10.11.30.1/24
set interfaces vlan unit 3 family inet filter input proxysg-fbf
set interfaces vlan unit 3 family inet address 10.11.40.1/24
set event-options policy rpm_down events PING_TEST_FAILED
set event-options policy rpm_down within 10 trigger on
set event-options policy rpm_down within 10 trigger 1
set event-options policy rpm_down attributes-match PING_TEST_FAILED.test-owner matches "^proxysg$"
set event-options policy rpm_down attributes-match PING_TEST_FAILED.test-name matches "^proxy-ping$"
set event-options policy rpm_down then event-script WXC-Healthcheck.slax arguments filter proxysg-fbf
set event-options policy rpm_down then event-script WXC-Healthcheck.slax arguments term t1
set event-options policy rpm_down then event-script WXC-Healthcheck.slax arguments action inactive
set event-options policy rpm_up events PING_TEST_COMPLETED
set event-options policy rpm_up within 20 trigger on
set event-options policy rpm_up within 20 trigger 1
set event-options policy rpm_up attributes-match PING_TEST_COMPLETED.test-owner matches "^proxysg$"
set event-options policy rpm_up attributes-match PING_TEST_COMPLETED.test-name matches "^proxy-ping$"
set event-options policy rpm_up then event-script WXC-Healthcheck.slax arguments filter proxysg-fbf
set event-options policy rpm_up then event-script WXC-Healthcheck.slax arguments term t1
set event-options policy rpm_up then event-script WXC-Healthcheck.slax arguments action active
set event-options policy rpm1_down events PING_TEST_FAILED
set event-options policy rpm1_down within 20 trigger on
set event-options policy rpm1_down within 20 trigger 1
set event-options policy rpm1_down attributes-match PING_TEST_FAILED.test-owner matches "^proxysg1$"
set event-options policy rpm1_down attributes-match PING_TEST_FAILED.test-name matches "^proxy1-ping$"
set event-options policy rpm1_down then event-script WXC-Healthcheck.slax arguments filter proxysg-fbf
set event-options policy rpm1_down then event-script WXC-Healthcheck.slax arguments term t2
set event-options policy rpm1_down then event-script WXC-Healthcheck.slax arguments action inactive
set event-options policy rpm1_up events PING_TEST_COMPLETED
set event-options policy rpm1_up within 20 trigger on
set event-options policy rpm1_up within 20 trigger 1
set event-options policy rpm1_up attributes-match PING_TEST_COMPLETED.test-owner matches "^proxysg1$"
set event-options policy rpm1_up attributes-match PING_TEST_COMPLETED.test-name matches "^proxy1-ping$"
set event-options policy rpm1_up then event-script WXC-Healthcheck.slax arguments filter proxysg-fbf
set event-options policy rpm1_up then event-script WXC-Healthcheck.slax arguments term t2
set event-options policy rpm1_up then event-script WXC-Healthcheck.slax arguments action active
set event-options event-script file WXC-Healthcheck.slax
set event-options traceoptions file wxc.out
set routing-options interface-routes rib-group inet PROXYSG
set routing-options static route 0.0.0.0/0 next-hop 10.11.20.2
set routing-options rib-groups PROXYSG import-rib inet.0
set routing-options rib-groups PROXYSG import-rib PROXYSG.inet.0
set routing-options rib-groups PROXYSG import-rib PROXYSG2.inet.0
set protocols igmp-snooping vlan all
set protocols rstp
set protocols lldp interface all
set protocols lldp-med interface all
set firewall family inet filter proxysg-fbf term t1 from source-address 10.11.40.0/24
set firewall family inet filter proxysg-fbf term t1 from destination-address 0.0.0.0/0
set firewall family inet filter proxysg-fbf term t1 from destination-port http
set firewall family inet filter proxysg-fbf term t1 from destination-port ftp
set firewall family inet filter proxysg-fbf term t1 from destination-port https
set firewall family inet filter proxysg-fbf term t1 then count redirected
set firewall family inet filter proxysg-fbf term t1 then routing-instance PROXYSG
set firewall family inet filter proxysg-fbf term t2 from source-address 10.11.40.0/24
set firewall family inet filter proxysg-fbf term t2 from destination-address 0.0.0.0/0
set firewall family inet filter proxysg-fbf term t2 from destination-port http
set firewall family inet filter proxysg-fbf term t2 from destination-port ftp
set firewall family inet filter proxysg-fbf term t2 from destination-port https
set firewall family inet filter proxysg-fbf term t2 then count redirected2
set firewall family inet filter proxysg-fbf term t2 then routing-instance PROXYSG2
set firewall family inet filter proxysg-fbf term default then accept
set routing-instances PROXYSG instance-type virtual-router
set routing-instances PROXYSG routing-options static route 0.0.0.0/0 qualified-next-hop 10.11.30.2 metric 5
set routing-instances PROXYSG routing-options static route 0.0.0.0/0 qualified-next-hop 10.11.20.2 metric 20
set routing-instances PROXYSG2 instance-type virtual-router
set routing-instances PROXYSG2 routing-options static route 0.0.0.0/0 qualified-next-hop 10.11.30.3 metric 5
set routing-instances PROXYSG2 routing-options static route 0.0.0.0/0 qualified-next-hop 10.11.20.2 metric 20
set services rpm probe proxysg test proxy-ping probe-type icmp-ping
set services rpm probe proxysg test proxy-ping target address 10.11.30.2
set services rpm probe proxysg test proxy-ping probe-count 3
set services rpm probe proxysg test proxy-ping probe-interval 1
set services rpm probe proxysg test proxy-ping test-interval 10
set services rpm probe proxysg test proxy-ping thresholds total-loss 1
set services rpm probe proxysg1 test proxy1-ping probe-type icmp-ping
set services rpm probe proxysg1 test proxy1-ping target address 10.11.30.3
set services rpm probe proxysg1 test proxy1-ping probe-count 3
set services rpm probe proxysg1 test proxy1-ping probe-interval 1
set services rpm probe proxysg1 test proxy1-ping test-interval 10
set services rpm probe proxysg1 test proxy1-ping thresholds total-loss 1
set ethernet-switching-options storm-control interface all
set vlans VLAN1 vlan-id 1
set vlans VLAN1 l3-interface vlan.1
set vlans VLAN2 vlan-id 2
set vlans VLAN2 l3-interface vlan.2
set vlans VLAN3 vlan-id 3
set vlans VLAN3 interface ge-0/0/2.0
set vlans VLAN3 l3-interface vlan.3
set vlans default l3-interface vlan.0
set poe interface all