Transparent Proxy Redirection with JunOS
I have to say, I love proxy servers. Transparent proxy is my preference. Of all the Proxy servers in the world, the best in my opinion is Blue Coat’s ProxySG appliance. With the Blue Coat ProxySG as your proxy in transparent mode, this allows us to inspect content, without the need for user input, and to direct the traffic to a proxy so you get all the benefits of Web Pulse, Web Filter, ProxyAV, Wan Optimisation and Flash Caching. Plus the use of CPL (Content Policy Language) to decide whether users should be allowed access to a site or not. With transparent proxy that responsibility is dealt with by the network, and quite right too. There are some applications which don’t, however, respond well to transparent proxy, especially those which don’t understand authentication (are you reading this Google, Apple and Adobe!!!) so they have to be handled on the ProxySG with some custom CPL, however these little issues shouldn’t’ stop you considering transparent proxy as an option if you are planning a Blue Coat deployment or any other proxy which supports transparent redirect.
As both EX and SRX use JunOS, the implementation on each is exactly the same and this is one of the great reasons to love JunOS. In order to do WCCP-like transparent redirect on EX switches or SRX firewalls, there are several configuration items to consider:
- The Filter Based Forwarding entry
- A Virtual Routing Instance
- A RIB group entry to combine the routing-instances
- Some failover monitoring in-case the proxy fails such as an RPM probe with Event Monitoring
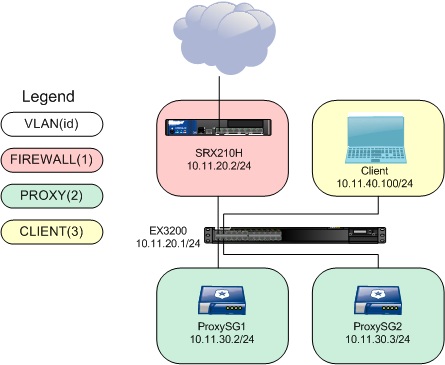
In the PoC lab, the following subnets/VLANs were used:
- VLAN1 – 10.11.20.0/24 – Egress route subnet (an SRX firewall is connected and the EX switch has a default route to it)
- VLAN2 – 10.11.30.0/24 – Proxy subnet used for the routing-instance configuration. PROXYSG ip is 10.11.30.2. PROXYSG2 ip is 10.11.30.3
- VLAN3 – 10.11.40.0/24 – Client subnet
First off, we setup a firewall filter to assign to an interface. The interface can be either family inet interface, or a virtual (VLAN) interface. This filter redirects anything from source subnet 10.11.40.0/24 (the client subnet) destined for anywhere on port 80, 443 or 21 to the proxy on routing-instance ‘PROXYSG’.
family inet {
filter proxysg-fbf {
term t1 {
from {
source-address {
10.11.40.0/24;
}
destination-address {
0.0.0.0/0;
}
destination-port [ http ftp https ];
}
then {
count redirected;
routing-instance PROXYSG;
}
}
In display set form, that looks like;
set firewall family inet filter proxysg-fbf term t1 from source-address 10.11.40.0/24
set firewall family inet filter proxysg-fbf term t1 from destination-address 0.0.0.0/0
set firewall family inet filter proxysg-fbf term t1 from destination-port http
set firewall family inet filter proxysg-fbf term t1 from destination-port ftp
set firewall family inet filter proxysg-fbf term t1 from destination-port https
set firewall family inet filter proxysg-fbf term t1 then count redirected
set firewall family inet filter proxysg-fbf term t1 then routing-instance PROXYSG
set firewall family inet filter proxysg-fbf term default then accept
Next, we need to have some way of redirecting the traffic ‘off-path’ to the proxy server. This is handled by a routing-instance, in this case to proxy server 10.11.30.2.
PROXYSG {
instance-type virtual-router;
routing-options {
static {
route 0.0.0.0/0 {
qualified-next-hop 10.11.30.2 {
metric 5;
}
}
}
}
}
set routing-instances PROXYSG instance-type virtual-router
set routing-instances PROXYSG routing-options static route 0.0.0.0/0 qualified-next-hop 10.11.30.2 metric 5
set routing-instances PROXYSG routing-options static route 0.0.0.0/0 qualified-next-hop 10.11.20.2 metric 20
Next, in order to combine the two routing-instances, we create a rib-group entry.
interface-routes {
rib-group inet PROXYSG;
}
static {
route 0.0.0.0/0 next-hop 10.11.20.2;
}
rib-groups {
PROXYSG {
import-rib [ inet.0 PROXYSG.inet.0 ];
}
}
set routing-options interface-routes rib-group inet PROXYSG
set routing-options static route 0.0.0.0/0 next-hop 10.11.20.2
set routing-options rib-groups PROXYSG import-rib inet.0
set routing-options rib-groups PROXYSG import-rib PROXYSG.inet.0
Finally, the filter we created earlier is assigned to an interface, in this case, the ingress interface which client traffic appears from.
vlan {
unit 3 {
family inet {
filter {
input proxysg-fbf;
}
address 10.11.40.1/24;
}
}
}
In order to have some failover capabilities, were the proxy to fail, we can use event monitoring probes on the EX switch to force a configuration change on the forwarding filter in the event the proxy fails. This is done using a custom monitoring script which was originally designed for use with Juniper WXC appliances.
The WXC-Healthcheck.slax file can be downloaded from here
The script should be uploaded to the EX switch using FTP or SCP and placed into /config/db/scripts/event/ (or whichever is relevant to the JunOS version you are running – tested on 11.4R2.14). Once loaded, you can create the RPM probe and event policy actions.
The event probe is setup as follows under the ‘services’ stanza within the configuration.
rpm {
probe proxysg {
test proxy-ping {
probe-type icmp-ping;
target address 10.11.30.2;
probe-count 3;
probe-interval 1;
test-interval 10;
thresholds {
total-loss 1;
}
}
}
set services rpm probe proxysg test proxy-ping probe-type icmp-ping
set services rpm probe proxysg test proxy-ping target address 10.11.30.2
set services rpm probe proxysg test proxy-ping probe-count 3
set services rpm probe proxysg test proxy-ping probe-interval 1
set services rpm probe proxysg test proxy-ping test-interval 10
set services rpm probe proxysg test proxy-ping thresholds total-loss 1
This will log either ‘PING_TEST_COMPLETED’ or ‘PING_TEST_FAILED’ in the ‘messages’ log on the switch.
Next, we create the event-options section to tell the switch what to do in the event of it seeing the ‘PING_TEST_COMPLETED’ or ‘PING_TEST_FAILED’ in the messages system log. The following two configuration options show what the EX switch will do in the event of each.
* In the event of a failure, disable the firewall filter.
policy rpm_down {
events PING_TEST_FAILED;
within 10 {
trigger on 1;
}
attributes-match {
PING_TEST_FAILED.test-owner matches "^proxysg$";
PING_TEST_FAILED.test-name matches "^proxy-ping$";
}
then {
event-script WXC-Healthcheck.slax {
arguments {
filter proxysg-fbf;
term t1;
action inactive;
}
}
}
}
* When the failure is fixed, re-enable the filter.
policy rpm_up {
events PING_TEST_COMPLETED;
within 20 {
trigger on 1;
}
attributes-match {
PING_TEST_COMPLETED.test-owner matches "^proxysg$";
PING_TEST_COMPLETED.test-name matches "^proxy-ping$";
}
then {
event-script WXC-Healthcheck.slax {
arguments {
filter proxysg-fbf;
term t1;
action active;
}
}
}
}
event-script {
file WXC-Healthcheck.slax;
}
traceoptions {
file wxc.out;
}
In display set for, that looks like;
set event-options policy rpm_down events PING_TEST_FAILED
set event-options policy rpm_down within 10 trigger on
set event-options policy rpm_down within 10 trigger 1
set event-options policy rpm_down attributes-match PING_TEST_FAILED.test-owner matches "^proxysg$"
set event-options policy rpm_down attributes-match PING_TEST_FAILED.test-name matches "^proxy-ping$"
set event-options policy rpm_down then event-script WXC-Healthcheck.slax arguments filter proxysg-fbf
set event-options policy rpm_down then event-script WXC-Healthcheck.slax arguments term t1
set event-options policy rpm_down then event-script WXC-Healthcheck.slax arguments action inactive
set event-options policy rpm_up events PING_TEST_COMPLETED
set event-options policy rpm_up within 20 trigger on
set event-options policy rpm_up within 20 trigger 1
set event-options policy rpm_up attributes-match PING_TEST_COMPLETED.test-owner matches "^proxysg$"
set event-options policy rpm_up attributes-match PING_TEST_COMPLETED.test-name matches "^proxy-ping$"
set event-options policy rpm_up then event-script WXC-Healthcheck.slax arguments filter proxysg-fbf
set event-options policy rpm_up then event-script WXC-Healthcheck.slax arguments term t1
set event-options policy rpm_up then event-script WXC-Healthcheck.slax arguments action active
set event-options event-script file WXC-Healthcheck.slax
set event-options traceoptions file wxc.out
If the proxy fails, the EX switch ‘event-options’ setting will see and act upon the following message log entry;
Apr 16 08:14:06 rmopd[992]: PING_TEST_FAILED: pingCtlOwnerIndex = proxysg, pingCtlTestName = proxy-ping
Every 20 seconds, it will re-check the message log, looking for the fail or success. If it sees a PING_TEST_COMPLETED, it will re-enable the filter.
Apr 16 08:21:13 rmopd[992]: PING_TEST_COMPLETED: pingCtlOwnerIndex = proxysg, pingCtlTestName = proxy-ping
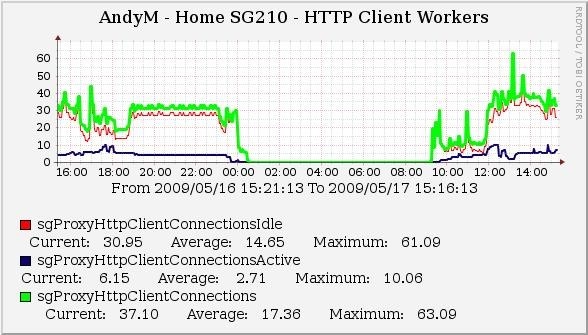
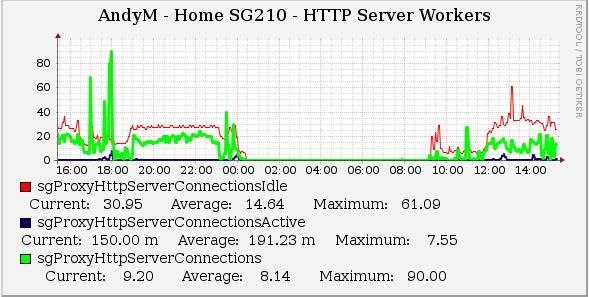
You can view the filter counters to see traffic being redirected as we added a counter to the firewall filter term.
root> show firewall filter proxysg-fbf
Filter: proxysg-fbf
Counters:
Name Bytes Packets
redirected 68424 479
FAILOVER TO A SECOND PROXY
You can add failover to a second proxy by adding a second routing-instance and firewall filter term quite easily in order to ensure that traffic is always proxied (thus, your corporate AUP is always enforced).
For example, here term t2 is added after term t1 on the forwarding filter –
filter proxysg-fbf {
term t1 {
from {
source-address {
10.11.40.0/24;
}
destination-address {
0.0.0.0/0;
}
destination-port [ http ftp https ];
}
then {
count redirected;
routing-instance PROXYSG;
}
}
term t2 {
from {
source-address {
10.11.40.0/24;
}
destination-address {
0.0.0.0/0;
}
destination-port [ http ftp https ];
}
then {
count redirected2;
routing-instance PROXYSG2;
}
}
term default {
then accept;
}
}
The new routing instance looks like the following –
PROXYSG2 {
instance-type virtual-router;
routing-options {
static {
route 0.0.0.0/0 {
qualified-next-hop 10.11.30.3 {
metric 5;
}
qualified-next-hop 10.11.20.2 {
metric 20;
}
}
}
}
}
The RIB group is amended to add the second PROXYSG2 routing-instance.
rib-groups {
PROXYSG {
import-rib [ inet.0 PROXYSG.inet.0 PROXYSG2.inet.0 ];
}
}
Once this is done, the EX switch will continue to monitor the PROXYSG ip (10.11.30.2) and set it as inactive should it fail. If it does, the second term of the firewall filter (term t2) will become active.
family inet {
filter proxysg-fbf {
inactive: term t1 { <<<<<<<<<<<<<<<<<<<<<<<<<<<
from {
source-address {
10.11.40.0/24;
}
destination-address {
0.0.0.0/0;
}
destination-port [ http ftp https ];
}
then {
count redirected;
routing-instance PROXYSG;
}
}
term t2 {
from {
source-address {
10.11.40.0/24;
}
destination-address {
0.0.0.0/0;
}
destination-port [ http ftp https ];
}
then {
count redirected2;
routing-instance PROXYSG2;
}
}
term default {
then accept;
}
}
}
You can, of course, setup a second event-option monitor to monitor the second PROXYSG2 proxy (10.11.30.3) so that it also is set as inactive were the proxy to fail.
Conclusion
So there it is, transparent redirect in a WCCP-like manner using JunOS. The implementation above has worked on both a test EX switch and an SRX. I’m still working on whether we can emulate the load-balancing functions available from WCCP, via JunOS but for now the above configuration would certainly give you failover if you were to have two proxies.
REFERENCES
WXC-Filter-Based-Forwarding
FULL SWITCH CONFIG
set version 11.4R2.14
set system root-authentication encrypted-password "REMOVED"
set system name-server 208.67.222.222
set system scripts op traceoptions file wxc.out
set system scripts op file WXC-Healthcheck.slax
set system services ssh protocol-version v2
set system syslog user * any emergency
set system syslog file messages any any
set system syslog file messages authorization info
set system syslog file interactive-commands interactive-commands any
set system ntp server 194.164.127.6
set interfaces ge-0/0/0 description EXTERNAL_INTERFACE
set interfaces ge-0/0/0 unit 0 family ethernet-switching port-mode access
set interfaces ge-0/0/0 unit 0 family ethernet-switching vlan members VLAN1
set interfaces ge-0/0/1 description INTERNAL_PROXY_INTERFACE
set interfaces ge-0/0/1 unit 0 family ethernet-switching port-mode access
set interfaces ge-0/0/1 unit 0 family ethernet-switching vlan members VLAN2
set interfaces ge-0/0/2 description INTERNAL_CLIENT_INTERFACE
set interfaces ge-0/0/2 unit 0 family ethernet-switching port-mode access
set interfaces ge-0/0/2 unit 0 family ethernet-switching vlan members VLAN3
set interfaces ge-0/0/3 description INTERNAL_PROXY2_INTERFACE
set interfaces ge-0/0/3 unit 0 family ethernet-switching port-mode access
set interfaces ge-0/0/3 unit 0 family ethernet-switching vlan members VLAN2
set interfaces ge-0/0/4 unit 0 family ethernet-switching
set interfaces ge-0/0/5 unit 0 family ethernet-switching
set interfaces ge-0/0/6 unit 0 family ethernet-switching
set interfaces ge-0/0/7 unit 0 family ethernet-switching
set interfaces ge-0/0/8 unit 0 family ethernet-switching
set interfaces ge-0/0/9 unit 0 family ethernet-switching
set interfaces ge-0/0/10 unit 0 family ethernet-switching
set interfaces ge-0/0/11 unit 0 family ethernet-switching
set interfaces ge-0/0/12 unit 0 family ethernet-switching
set interfaces ge-0/0/13 unit 0 family ethernet-switching
set interfaces ge-0/0/14 unit 0 family ethernet-switching
set interfaces ge-0/0/15 unit 0 family ethernet-switching
set interfaces ge-0/0/16 unit 0 family ethernet-switching
set interfaces ge-0/0/17 unit 0 family ethernet-switching
set interfaces ge-0/0/18 unit 0 family ethernet-switching
set interfaces ge-0/0/19 unit 0 family ethernet-switching
set interfaces ge-0/0/20 unit 0 family ethernet-switching
set interfaces ge-0/0/21 unit 0 family ethernet-switching
set interfaces ge-0/0/22 unit 0 family ethernet-switching
set interfaces ge-0/0/23 unit 0 family ethernet-switching
set interfaces ge-0/1/0 unit 0 family ethernet-switching
set interfaces xe-0/1/0 unit 0 family ethernet-switching
set interfaces ge-0/1/1 unit 0 family ethernet-switching
set interfaces xe-0/1/1 unit 0 family ethernet-switching
set interfaces ge-0/1/2 unit 0 family ethernet-switching
set interfaces ge-0/1/3 unit 0 family ethernet-switching
set interfaces me0 unit 0 family inet
set interfaces vlan unit 0 family inet
set interfaces vlan unit 1 family inet address 10.11.20.1/24
set interfaces vlan unit 2 family inet address 10.11.30.1/24
set interfaces vlan unit 3 family inet filter input proxysg-fbf
set interfaces vlan unit 3 family inet address 10.11.40.1/24
set event-options policy rpm_down events PING_TEST_FAILED
set event-options policy rpm_down within 10 trigger on
set event-options policy rpm_down within 10 trigger 1
set event-options policy rpm_down attributes-match PING_TEST_FAILED.test-owner matches "^proxysg$"
set event-options policy rpm_down attributes-match PING_TEST_FAILED.test-name matches "^proxy-ping$"
set event-options policy rpm_down then event-script WXC-Healthcheck.slax arguments filter proxysg-fbf
set event-options policy rpm_down then event-script WXC-Healthcheck.slax arguments term t1
set event-options policy rpm_down then event-script WXC-Healthcheck.slax arguments action inactive
set event-options policy rpm_up events PING_TEST_COMPLETED
set event-options policy rpm_up within 20 trigger on
set event-options policy rpm_up within 20 trigger 1
set event-options policy rpm_up attributes-match PING_TEST_COMPLETED.test-owner matches "^proxysg$"
set event-options policy rpm_up attributes-match PING_TEST_COMPLETED.test-name matches "^proxy-ping$"
set event-options policy rpm_up then event-script WXC-Healthcheck.slax arguments filter proxysg-fbf
set event-options policy rpm_up then event-script WXC-Healthcheck.slax arguments term t1
set event-options policy rpm_up then event-script WXC-Healthcheck.slax arguments action active
set event-options policy rpm1_down events PING_TEST_FAILED
set event-options policy rpm1_down within 20 trigger on
set event-options policy rpm1_down within 20 trigger 1
set event-options policy rpm1_down attributes-match PING_TEST_FAILED.test-owner matches "^proxysg1$"
set event-options policy rpm1_down attributes-match PING_TEST_FAILED.test-name matches "^proxy1-ping$"
set event-options policy rpm1_down then event-script WXC-Healthcheck.slax arguments filter proxysg-fbf
set event-options policy rpm1_down then event-script WXC-Healthcheck.slax arguments term t2
set event-options policy rpm1_down then event-script WXC-Healthcheck.slax arguments action inactive
set event-options policy rpm1_up events PING_TEST_COMPLETED
set event-options policy rpm1_up within 20 trigger on
set event-options policy rpm1_up within 20 trigger 1
set event-options policy rpm1_up attributes-match PING_TEST_COMPLETED.test-owner matches "^proxysg1$"
set event-options policy rpm1_up attributes-match PING_TEST_COMPLETED.test-name matches "^proxy1-ping$"
set event-options policy rpm1_up then event-script WXC-Healthcheck.slax arguments filter proxysg-fbf
set event-options policy rpm1_up then event-script WXC-Healthcheck.slax arguments term t2
set event-options policy rpm1_up then event-script WXC-Healthcheck.slax arguments action active
set event-options event-script file WXC-Healthcheck.slax
set event-options traceoptions file wxc.out
set routing-options interface-routes rib-group inet PROXYSG
set routing-options static route 0.0.0.0/0 next-hop 10.11.20.2
set routing-options rib-groups PROXYSG import-rib inet.0
set routing-options rib-groups PROXYSG import-rib PROXYSG.inet.0
set routing-options rib-groups PROXYSG import-rib PROXYSG2.inet.0
set protocols igmp-snooping vlan all
set protocols rstp
set protocols lldp interface all
set protocols lldp-med interface all
set firewall family inet filter proxysg-fbf term t1 from source-address 10.11.40.0/24
set firewall family inet filter proxysg-fbf term t1 from destination-address 0.0.0.0/0
set firewall family inet filter proxysg-fbf term t1 from destination-port http
set firewall family inet filter proxysg-fbf term t1 from destination-port ftp
set firewall family inet filter proxysg-fbf term t1 from destination-port https
set firewall family inet filter proxysg-fbf term t1 then count redirected
set firewall family inet filter proxysg-fbf term t1 then routing-instance PROXYSG
set firewall family inet filter proxysg-fbf term t2 from source-address 10.11.40.0/24
set firewall family inet filter proxysg-fbf term t2 from destination-address 0.0.0.0/0
set firewall family inet filter proxysg-fbf term t2 from destination-port http
set firewall family inet filter proxysg-fbf term t2 from destination-port ftp
set firewall family inet filter proxysg-fbf term t2 from destination-port https
set firewall family inet filter proxysg-fbf term t2 then count redirected2
set firewall family inet filter proxysg-fbf term t2 then routing-instance PROXYSG2
set firewall family inet filter proxysg-fbf term default then accept
set routing-instances PROXYSG instance-type virtual-router
set routing-instances PROXYSG routing-options static route 0.0.0.0/0 qualified-next-hop 10.11.30.2 metric 5
set routing-instances PROXYSG routing-options static route 0.0.0.0/0 qualified-next-hop 10.11.20.2 metric 20
set routing-instances PROXYSG2 instance-type virtual-router
set routing-instances PROXYSG2 routing-options static route 0.0.0.0/0 qualified-next-hop 10.11.30.3 metric 5
set routing-instances PROXYSG2 routing-options static route 0.0.0.0/0 qualified-next-hop 10.11.20.2 metric 20
set services rpm probe proxysg test proxy-ping probe-type icmp-ping
set services rpm probe proxysg test proxy-ping target address 10.11.30.2
set services rpm probe proxysg test proxy-ping probe-count 3
set services rpm probe proxysg test proxy-ping probe-interval 1
set services rpm probe proxysg test proxy-ping test-interval 10
set services rpm probe proxysg test proxy-ping thresholds total-loss 1
set services rpm probe proxysg1 test proxy1-ping probe-type icmp-ping
set services rpm probe proxysg1 test proxy1-ping target address 10.11.30.3
set services rpm probe proxysg1 test proxy1-ping probe-count 3
set services rpm probe proxysg1 test proxy1-ping probe-interval 1
set services rpm probe proxysg1 test proxy1-ping test-interval 10
set services rpm probe proxysg1 test proxy1-ping thresholds total-loss 1
set ethernet-switching-options storm-control interface all
set vlans VLAN1 vlan-id 1
set vlans VLAN1 l3-interface vlan.1
set vlans VLAN2 vlan-id 2
set vlans VLAN2 l3-interface vlan.2
set vlans VLAN3 vlan-id 3
set vlans VLAN3 interface ge-0/0/2.0
set vlans VLAN3 l3-interface vlan.3
set vlans default l3-interface vlan.0
set poe interface all