Dynamic Blocklist’s with JunOS
Doing policy based filtering on JunOS when the list of IP’s to control is large (many 100’s or 1000’s) can lead to unexpected results in policy processing. For example, a customer recently needed to restrict an external entity which had an IPSec tunnel to their HQ to a list of 200+ individual /32 IP addresses on their internal network. Doing it with policy against an IPSec tunnel on the SRX is possible, but the result was that it worked intermittently at best. I think the SRX (certainly the branch office models) don’t have the processing power for that many individual IP addresses in an ACL policy.
Instead of applying control at the policy layer, I configured stateless firewall filters to do the same thing. Processing it this way didn’t seem to add a huge load to the SRX so this got me to thinking about whether it’s possible to integrate a dynamic list such as the excellent Spamhaus DROP and EDROP block lists which are commonly used by ISP’s to protect users against attacks from known malicious networks, or those which have been hijacked. I also added the equally excellent DShield.org, Emerging Threats, and Team-Cymru lists.
The desired ruleset would look something like –
filter dropped {
       term dropped {
            from {
              address {
                 1.1.1.0/24
                 2.2.2.2/32
                 }
            then {
                 count dropped;
                 syslog;
                 discard;
            }
       }
       term default {
            then accept;
       }
}
In display set form, it looks as follows –
set firewall family inet filter dropped term dropped from address 1.1.1.1/24
set firewall family inet filter dropped term dropped from address 2.2.2.2/32
set firewall family inet filter dropped term dropped then count dropped
set firewall family inet filter dropped term dropped then syslog
set firewall family inet filter dropped term dropped then discard
set firewall family inet filter dropped term default then accept
Something like this has been done before. See the following link for information. The link defines using extra binary files on JunOS which I wasn’t comfortable doing, especially as the article was written in 2005, and updated in 2009 to mention that the binary files may no longer work in later versions of JunOS. What follows has been tested on JunOS 10.4 and 11.2.
DISCLAIMER – I MAKE NO GUARANTEES THAT THIS WILL WORK IN YOUR ENVIRONMENT, AND ASSUME NO RESPONSIBILITY FOR ANY ISSUES, DAMAGE OR LOSS OF SERVICE YOU ENCOUNTER IN USING THE SCRIPTS OR INSTRUCTIONS IN THIS ARTICLE.
Setting up the filter is relatively straight-forward. The problem is doing it in an automated manner. JunOS is based on FreeBSD, which is very useful as underneath the normal JunOS cli, you can run cron jobs.
First off, setup a user on your SRX or EX switch which can be used without a password login. I found the following article very useful in helping to set that bit up. As I’m using a remote Linux host to generate the file automatically which will then be sent to the SRX, I do all the work on the Linux host. We’ll get to that bit in a minute.
Once the user has been setup (I created username ‘cronadmin’ on my SRX), you can add the following script to the users home directory in the following steps.
Login as ‘cronadmin’ from the device which is going to send the files when they are updated.
Run the command
start shell
Now you are on the underlying BSD shell, you can use traditional Unix commands, like ‘vi’ to edit/create the file. Use ‘vi’ to create a file called ‘filterupdate.sh’ (e.g ‘vi filterupdate.sh’). If you need more help on how to use VI, see the following link. The file is used by cron on the SRX to load the updated ‘dropped.txt’ file into the existing configuration, after which it commits, then quits.
{
echo "configure"
echo "load replace dropped.txt"
echo "commit check"
echo "commit"
echo "exit"
} | /usr/sbin/cli
Once you have edited and closed the file, you can move to the next stage in the dynamic filter implementation.
We move over to the Linux host used to generate the file. On that host, we create two scripts (I put mine in /usr/local/bin). Run the command ‘chmod +x <scriptname>‘ against both files to make them executable.
1) etget.sh – which gets the files we need.
#!/bin/sh
/usr/bin/wget --user-agent="Mozilla/5.0 (Macintosh; Intel Mac OS X 10.7; rv:7.0.1) Gecko/20100101 Firefox/7.0.1" -N http://www.spamhaus.org/drop/drop.txt
/usr/bin/wget --user-agent="Mozilla/5.0 (Macintosh; Intel Mac OS X 10.7; rv:7.0.1) Gecko/20100101 Firefox/7.0.1" -N http://www.spamhaus.org/drop/edrop.txt
/usr/bin/wget --user-agent="Mozilla/5.0 (Macintosh; Intel Mac OS X 10.7; rv:7.0.1) Gecko/20100101 Firefox/7.0.1" -N http://www.dshield.org/block.txt
/usr/bin/wget --user-agent="Mozilla/5.0 (Macintosh; Intel Mac OS X 10.7; rv:7.0.1) Gecko/20100101 Firefox/7.0.1" -N http://www.team-cymru.org/Services/Bogons/fullbogons-ipv4.txt
/usr/bin/wget --user-agent="Mozilla/5.0 (Macintosh; Intel Mac OS X 10.7; rv:7.0.1) Gecko/20100101 Firefox/7.0.1" -N http://rules.emergingthreats.net/fwrules/emerging-IPTABLES-RBN.rules
2) et.sh which processes the files.
#!/bin/sh
UPDATE1="dropped.txt"
# START ECHOING SRX STANZA TERMS TO THE FILTER LIST FILE
echo "firewall {" > $UPDATE1
echo "family inet {" >> $UPDATE1
echo "replace:" >> $UPDATE1
echo "filter dropped {" >> $UPDATE1
echo " term dropped {" >> $UPDATE1
echo " from {" >> $UPDATE1
echo " address {" >> $UPDATE1
cat emerging-IPTABLES-RBN.rules | while read H
do
sed '/#/d' | sed '/^$/d' | grep "src" | awk '{print $7}' | sed 's/$/;/' >> $UPDATE1
done
cat drop.txt | while read H
do
sed '/^;/d' | awk '{print $1}' | sed 's/$/;/' >> $UPDATE1
done
cat edrop.txt | while read H
do
sed '/^;/d' | awk '{print $1}' | sed 's/$/;/' >> $UPDATE1
done
cat block.txt | while read H
do
sed '/#/d' | sed '/Start/d' | sed '/^$/d' | sed '/127.0.0.0/d' | awk '{print $1}' | sed 's/$/\/24/' | sed 's/$/;/' >> $UPDATE1
done
cat fullbogons-ipv4.txt | while read H
do
sed '/#/d' | sed '/0.0.0.0/d' | sed '/172.0.0.0\/9/d' | sed '/172.16.0.0/d' | sed '/192.168.0.0/d' | sed '/224.0.0.0/d' | sed '/127.0.0.0/d' | sed 's/$/;/' >>$UPDATE1
done
echo "\n }" >> $UPDATE1
echo " } " >> $UPDATE1
echo " then { " >> $UPDATE1
echo " count dropped;" >> $UPDATE1
echo " syslog;" >> $UPDATE1
echo " discard; " >> $UPDATE1
echo " } " >> $UPDATE1
echo " } " >> $UPDATE1
echo " term default {" >> $UPDATE1
echo " then accept;" >> $UPDATE1
echo " }" >> $UPDATE1
echo " }" >> $UPDATE1
echo " }" >> $UPDATE1
echo " }" >> $UPDATE1
#
# COPY THE CREATED FILE ACROSS TO THE SRX
scp $UPDATE1 cronadmin@<SRX_IP_ADDRESS>:/cf/var/home/cronadmin
You’ll notice that the last command in the ‘et.sh’ file uses the Linux ‘scp’ command (Secure Copy). As it is called in a script, this is why we use an account which doesn’t require a password.
Once the scripts are configured, we can setup a cronjob on the Linux server which will generate and copy the file to the SRX – Run the command ‘crontab -e’. then insert the following entries.
00 1,3,5,7,9,11,13,15,17,19,21,23 * * * (cd /usr/local/bin; ./etget.sh)
5 1,3,5,7,9,11,13,15,17,19,21,23 * * * (cd /usr/local/bin; ./et.sh)
The above runs the ‘etget.sh’ every two hours, on the hour, and ‘et.sh’ at every two hours, and 5 minutes past the hour.
Now go back to your SRX, and login as the ‘cronadmin’ user and start the shell.
root@debian:/usr/local/bin# ssh cronadmin@srx
--- JUNOS 10.4R14.2 built 2013-05-03 06:11:23 UTC
cronadmin@SRX210> start shell
%
Now execute the command ‘crontab -e’ and paste in the following –
15 1,3,5,7,9,11,13,15,17,19,21,23 * * * (cd /cf/var/home/cronadmin; sh /filterupdate.sh)
This sets the SRX to run the cronjob every two hours, at 15 minutes past the hour. On the SRX, the default crontab editor is ‘VI’ so refer to the link previously in this article in order to become familiar with ‘vi’.
Finally, in order to make the filter active, it has to be applied to an interface.
fe-0/0/7 {
     unit 0 {
            family inet {
                      filter {
                           input dropped;
                      }
                      address 172.16.111.111/24;
            }
       }
}
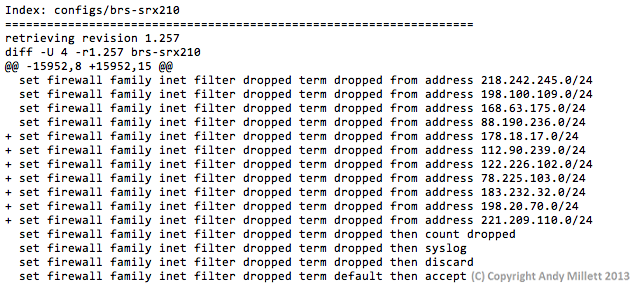
With this all done, any addresses matching the filter should now be dropped –

The script files I used can be downloaded using the following links –
et.txt
etget.txt
filterupdate.txt
UPDATE 21/07/13
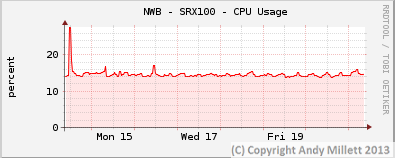
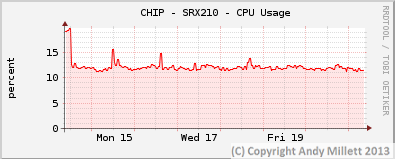
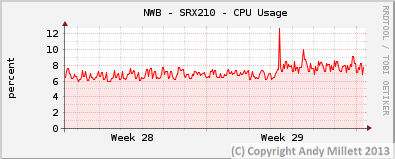
Since configuring the filters and publishing this article, I’ve been monitoring the CPU/Memory use of the SRX devices I have the filter applied too, just in-case there may have been an adverse affect on system load. I have it configured on three SRX’s, two don’t use the Juniper IDS engine, one does.
On the non-IDS SRX’s, CPU and memory use hasn’t been adversely effected (NWB – SRX100, CHIP – SRX210). On the SRX which uses IDS (NWB -SRX210), there’s a slight increase on CPU usage when the device applies the updates but it seems to return to normal once the update has been applied.
Non-IDS
IDS

UPDATE 29/07/2013
One additional update concerning the script which runs on the SRX itself. I’ve discovered that the cron entry on the SRX doesn’t actually fire the script off. We use RANCID to monitor configuration changes on our JunOS devices, and I realised something was up when I wasn’t getting configuration change alerts from RANCID which would indicate the ‘dropped’ firewall filter was being updated.
As a consequence, the crontab entry has changed from this –
15 1,3,5,7,9,11,13,15,17,19,21,23 * * * (cd /cf/var/home/cronadmin; ./filterupdate.sh)
To this –
15 1,3,5,7,9,11,13,15,17,19,21,23 * * * (cd /cf/var/home/cronadmin; sh filterupdate.sh)
RANCID is now logging updates –
I’ve also modified the etget.sh script. All files are downloaded using wget -N now. The reason being, this is less demanding on the blocklists I use as it only downloads the file if it has changed (the ‘-N’ switch).
The new script looks like –
#!/bin/sh
/usr/bin/wget --user-agent="Mozilla/5.0 (Macintosh; Intel Mac OS X 10.7; rv:7.0.1) Gecko/20100101 Firefox/7.0.1" -N http://www.spamhaus.org/drop/drop.txt
/usr/bin/wget --user-agent="Mozilla/5.0 (Macintosh; Intel Mac OS X 10.7; rv:7.0.1) Gecko/20100101 Firefox/7.0.1" -N http://www.spamhaus.org/drop/edrop.txt
/usr/bin/wget --user-agent="Mozilla/5.0 (Macintosh; Intel Mac OS X 10.7; rv:7.0.1) Gecko/20100101 Firefox/7.0.1" -N http://www.dshield.org/block.txt
/usr/bin/wget --user-agent="Mozilla/5.0 (Macintosh; Intel Mac OS X 10.7; rv:7.0.1) Gecko/20100101 Firefox/7.0.1" -N http://www.team-cymru.org/Services/Bogons/fullbogons-ipv4.txt
/usr/bin/wget --user-agent="Mozilla/5.0 (Macintosh; Intel Mac OS X 10.7; rv:7.0.1) Gecko/20100101 Firefox/7.0.1" -N http://rules.emergingthreats.net/fwrules/emerging-IPTABLES-RBN.rules
These changes have been applied to the script links above.
UPDATE 04/09/2013
Since applying the dynamic lists to my SRX’s, I’ve been monitoring it’s progress on and off. All seems to be well with the scripts; RANCID is logging the changes, and the firewall filter output is showing dropped packets when I check manually. CPU and Memory use are still pretty stable, although it does take an extra few seconds (on the Branch SRX anyway), to apply changes.
The filter has an action of ‘syslog’. set against the ‘then’ clause, so I thought it would be useful to post what that does at the syslog end. I use ELSA to log traffic I’m interested in for later parsing when I think there may be a problem. The ELSA database has shown there’s actually quite a lot of traffic logged against these dynamic blocklists. Searching the database for ‘PFE_FW_SYSLOG_IP’ which is the field entry the SRX uses to send anything matching the firewall filter when the ‘syslog’ action is set.
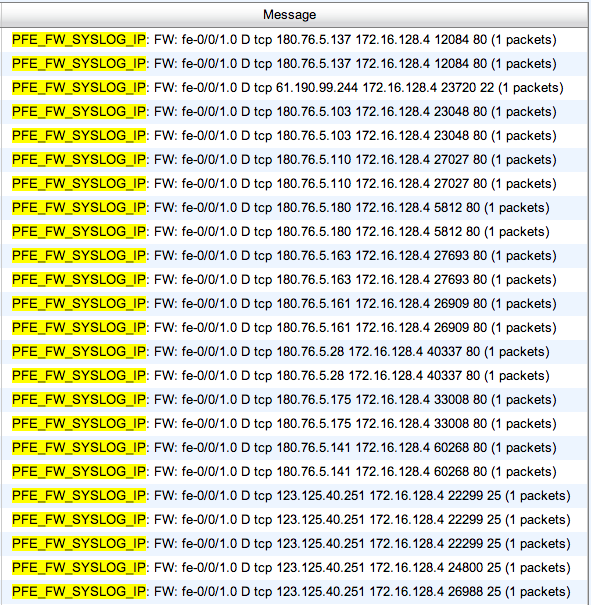
There’s quite a mix of dport types there, mostly well-known ports though (HTTP, HTTPS, SMTP and SSH).
UPDATE 08/12/2013
The script has been working well for over 6 months now, however after a short time, I was curious in seeing which lists the filter was matching against. As a consequence, I rewrote the et.sh script to split the various blocklists into individual terms. Here’s the new et.sh script –
#!/bin/sh
UPDATE1="dropped.txt"
# START ECHOING SRX STANZA TERMS TO THE FILTER LIST FILE
echo "firewall {" > $UPDATE1
echo "family inet {" >> $UPDATE1
echo "replace:" >> $UPDATE1
echo "filter dropped {" >> $UPDATE1
echo " term emergingcc {" >> $UPDATE1
echo " from {" >> $UPDATE1
echo " address {" >> $UPDATE1
cat emerging-IPTABLES-CC.rules | while read H
do
sed '/#/d' | sed '/^$/d' | grep "src" | awk '{print $7}' | sed 's/$/;/' >> $UPDATE1
done
echo "\n }" >> $UPDATE1
echo " } " >> $UPDATE1
echo " then { " >> $UPDATE1
echo " count emergingcc-dropped;" >> $UPDATE1
echo " syslog;" >> $UPDATE1
echo " discard; " >> $UPDATE1
echo " } " >> $UPDATE1
echo " } " >> $UPDATE1
echo " term emergingrbn {" >> $UPDATE1
echo " from {" >> $UPDATE1
echo " address {" >> $UPDATE1
cat emerging-IPTABLES-RBN.rules | while read H
do
sed '/#/d' | sed '/^$/d' | grep "src" | awk '{print $7}' | sed 's/$/;/' >> $UPDATE1
done
echo "\n }" >> $UPDATE1
echo " } " >> $UPDATE1
echo " then { " >> $UPDATE1
echo " count emergingrbn-dropped;" >> $UPDATE1
echo " syslog;" >> $UPDATE1
echo " discard; " >> $UPDATE1
echo " } " >> $UPDATE1
echo " } " >> $UPDATE1
echo " term spamhaus-drop {" >> $UPDATE1
echo " from {" >> $UPDATE1
echo " address {" >> $UPDATE1
cat drop.txt | while read H
do
sed '/^;/d' | awk '{print $1}' | sed 's/$/;/' >> $UPDATE1
done
echo "\n }" >> $UPDATE1
echo " } " >> $UPDATE1
echo " then { " >> $UPDATE1
echo " count spamhaus-drop;" >> $UPDATE1
echo " syslog;" >> $UPDATE1
echo " discard; " >> $UPDATE1
echo " } " >> $UPDATE1
echo " } " >> $UPDATE1
echo " term spamhaus-edrop {" >> $UPDATE1
echo " from {" >> $UPDATE1
echo " address {" >> $UPDATE1
cat edrop.txt | while read H
do
sed '/^;/d' | awk '{print $1}' | sed 's/$/;/' >> $UPDATE1
done
echo "\n }" >> $UPDATE1
echo " } " >> $UPDATE1
echo " then { " >> $UPDATE1
echo " count spamhaus-edrop;" >> $UPDATE1
echo " syslog;" >> $UPDATE1
echo " discard; " >> $UPDATE1
echo " } " >> $UPDATE1
echo " } " >> $UPDATE1
echo " term dshield-block {" >> $UPDATE1
echo " from {" >> $UPDATE1
echo " address {" >> $UPDATE1
cat block.txt | while read H
do
sed '/#/d' | sed '/Start/d' | sed '/^$/d' | sed '/127.0.0.0/d' | awk '{print $1}' | sed 's/$/\/24/' | sed 's/$/;/' >> $UPDATE1
done
echo "\n }" >> $UPDATE1
echo " } " >> $UPDATE1
echo " then { " >> $UPDATE1
echo " count dshield-block;" >> $UPDATE1
echo " syslog;" >> $UPDATE1
echo " discard; " >> $UPDATE1
echo " } " >> $UPDATE1
echo " } " >> $UPDATE1
echo " term team-cymru {" >> $UPDATE1
echo " from {" >> $UPDATE1
echo " address {" >> $UPDATE1
cat fullbogons-ipv4.txt | while read H
do
sed '/#/d' | sed '/0.0.0.0/d' | sed '/172.0.0.0\/9/d' | sed '/172.16.0.0/d' | sed '/192.168.0.0/d' | sed '/224.0.0.0/d' | sed '/127.0.0.0/d' | sed 's/$/;/' >> $UPDATE1
done
echo "\n }" >> $UPDATE1
echo " } " >> $UPDATE1
echo " then { " >> $UPDATE1
echo " count blocked-bogons;" >> $UPDATE1
echo " syslog;" >> $UPDATE1
echo " discard; " >> $UPDATE1
echo " } " >> $UPDATE1
echo " } " >> $UPDATE1
echo " term collective-intel {" >> $UPDATE1
echo " from {" >> $UPDATE1
echo " address {" >> $UPDATE1
cat ci-badguys.txt | while read H
do
sed 's/$/;/' >> $UPDATE1
done
echo "\n }" >> $UPDATE1
echo " } " >> $UPDATE1
echo " then { " >> $UPDATE1
echo " count ciarmy-dropped;" >> $UPDATE1
echo " syslog;" >> $UPDATE1
echo " discard; " >> $UPDATE1
echo " } " >> $UPDATE1
echo " } " >> $UPDATE1
echo " term default {" >> $UPDATE1
echo " then accept;" >> $UPDATE1
echo " }" >> $UPDATE1
echo " }" >> $UPDATE1
echo " }" >> $UPDATE1
echo " }" >> $UPDATE1
#
# COPY THE CREATED FILE ACROSS TO THE SRX
scp $UPDATE1 cronadmin@<SRX_IP_ADDRESS>:/cf/var/home/cronadmin
Example copies of the script can be found under the following links –
Now I can see which are matching.

Adding in new terms for your own purposes is actually quite easy once the basic file structure is setup using et.txt. Simply copy an existing ‘term’, then paste in and the relevant location you want it to match.
For example, yesterday I added the Collective Intelligence blocklists provided by the nice folks over at SentinalIPS.
echo " term collective-intel {" >> $UPDATE1
echo " from {" >> $UPDATE1
echo " address {" >> $UPDATE1
cat ci-badguys.txt | while read H
do
sed 's/$/;/' >> $UPDATE1
done
echo "\n }" >> $UPDATE1
echo " } " >> $UPDATE1
echo " then { " >> $UPDATE1
echo " count ciarmy-dropped;" >> $UPDATE1
echo " syslog;" >> $UPDATE1
echo " discard; " >> $UPDATE1
echo " } " >> $UPDATE1
echo " } " >> $UPDATE1
UPDATE 30/01/2014
I had an issue recently with my dynamic blocklist implementation, the issue was quite a biggie, as it took out my connections for a short period, including the normal SSH/HTTP access. Not good.
Luckily, I have alternate access to the SRX devices on an interface which the filter doesn’t run on, so I was able to get in and determine what had gone wrong. To cut a long story short, the issue related to one of the dynamic blocklists I use not returning the content expected, so the multiple sed, awk and other commands I use to filter the text files failed to pickup a suitable list of IP addresses which needed to be added and basically left the filter looking like this –
andy@NWB-SRX100> show configuration firewall family inet filter dropped term t1
from {
 address {
}
}
then {
 count block;
 syslog;
 discard;
}
If you use firewall filters regularly in JunOS, you’ll see the problem immediately. If you don’t, I’ll explain; the ‘from’ ‘address’ part of the term has no matching addresses, so basically it’s saying ‘match any address’. The ‘then’ part of the term has an action of ‘discard’. Oh dear, that’s just not good at all. This is why the firewall started dropping connections.
So, having learned my lesson, I’ve rewritten the script. Instead of trusting that the excellent blacklist providers will give me the data format I need, I now check that the data can be manipulated in the way I need before writing it to an update file which the SRX ‘load replace’s’. Using an if-statement (if [ -z <string>] meaning true if the string is empty), the script inserts, or doesn’t insert the updated statement to the blocklist update. Using the awesome DShield block list as an example –
DSTEST=`cat block.txt | sed '/#/d' | sed '/Start/d' | sed '/^$/d' | awk '{print $1}'`
if [ -z "$DSTEST" ] ; then
echo "No Output for DShield"
else
echo "Looks good for DShield"
echo " term dshield-dropped {" >> $UPDATE
echo " from {" >> $UPDATE
echo " address {" >> $UPDATE
cat block.txt | while read H
do
sed '/#/d' | sed '/Start/d' | sed '/^$/d' | awk '{print $1}' | sed 's/$/\/24/' | sed 's/$/;/' >> $UPDATE
done
echo " }" >> $UPDATE
echo " } " >> $UPDATE
echo " then { " >> $UPDATE
echo " count dshield-dropped;" >> $UPDATE
echo " syslog;" >> $UPDATE
echo " discard; " >> $UPDATE
echo " } " >> $UPDATE
echo " } " >> $UPDATE
fi
DSTEST=`cat block.txt | sed ‘/#/d’ | sed ‘/Start/d’ | sed ‘/^$/d’ | awk ‘{print $1}’` is the output to check for.
So the if statement goes –
if [ -z “$DSTEST” ] ; then
# Nothing is outputted, do nothing else.
echo “No output from DShield”
else
# Something is outputted, write the term.
echo “Looks good from DShield”
fi
Normally, the Dshield block list looks like this –
#
# DShield.org Recommended Block List
# (c) 2007 DShield.org
# some rights reserved. Details http://creativecommons.org/licenses/by-nc-sa/2.5/
# use on your own risk. No warranties implied.
# primary URL: http://feeds.dshield.org/block.txt
# PGP Sign.: http://feeds.dshield.org/block.txt.asc
#
# comments: info@dshield.org
# updated: Thu Jan 30 20:53:15 2014 UTC
#
# This list summarizes the top 20 attacking class C (/24) subnets
# over the last three days. The number of 'attacks' indicates the
# number of targets reporting scans from this subnet.
#
#
# Columns (tab delimited):
#
# (1) start of netblock
# (2) end of netblock
# (3) subnet (/24 for class C)
# (4) number of targets scanned
# (5) name of Network
# (6) Country
# (7) contact email address
#
# If a range is assigned to multiple users, the first one is listed.
#
Start End Netblock Attacks Name Country email
187.33.1.0 187.33.1.255 24 4094
212.175.155.0 212.175.155.255 24 2043 TR ipg@telekom.gov.tr
222.186.62.0 222.186.62.255 24 1821
218.2.22.0 218.2.22.255 24 1788 CHINANET jiangsu province huaian city network CN abuse@pub.hy.jsinfo.net
61.174.51.0 61.174.51.255 24 1405 Chinanet CN antispam@dcb.hz.zj.cn
195.178.109.0 195.178.109.255 24 1335 PROVIDER RU [no email]
61.147.70.0 61.147.70.255 24 1211 CHINANET-BACKBONE No.31,Jin-rong Street CN abuse@jsinfo.net
194.106.140.0 194.106.140.255 24 1091
62.193.234.0 62.193.234.255 24 1021 AMENAMENDEDICATED FR abuse@amen.fr
88.198.228.0 88.198.228.255 24 1010
41.86.112.0 41.86.112.255 24 1003
124.193.109.0 124.193.109.255 24 980 DXTNET Beijing Dian-Xin-Tong Network Technologies Co., Ltd. CN liudonghai@btte.net
213.80.171.0 213.80.171.255 24 961
67.161.31.0 67.161.31.255 24 939 ComcastCableCommunications,IPServices US abuse@comcast.net
81.17.24.0 81.17.24.255 24 855 RELIANS Autonomous System RU james@priivatelayer.com.pa
62.28.131.0 62.28.131.255 24 761
218.242.101.0 218.242.101.255 24 715 CN ipas@cnnic.cn
195.154.75.0 195.154.75.255 24 535 Cable&Wireless France FR dponzone@isdnet.net
80.82.70.0 80.82.70.255 24 435
46.163.108.0 46.163.108.255 24 384
#
#
# END
#
# finished list generation: Thu Jan 30 20:53:15 2014 UTC
The script changes I’ve implemented deem that if it looks like the following, the et.sh script will not insert the dshield term into the next update script –
#
# DShield.org Recommended Block List
# (c) 2007 DShield.org
# some rights reserved. Details http://creativecommons.org/licenses/by-nc-sa/2.5/
# use on your own risk. No warranties implied.
# primary URL: http://feeds.dshield.org/block.txt
# PGP Sign.: http://feeds.dshield.org/block.txt.asc
#
# comments: info@dshield.org
# updated: Thu Jan 30 20:53:15 2014 UTC
#
# This list summarizes the top 20 attacking class C (/24) subnets
# over the last three days. The number of 'attacks' indicates the
# number of targets reporting scans from this subnet.
#
#
# Columns (tab delimited):
#
# (1) start of netblock
# (2) end of netblock
# (3) subnet (/24 for class C)
# (4) number of targets scanned
# (5) name of Network
# (6) Country
# (7) contact email address
#
# If a range is assigned to multiple users, the first one is listed.
#
Start End Netblock Attacks Name Country email
#
#
# END
#
# finished list generation: Thu Jan 30 20:53:15 2014 UTC
If the script doesn’t find the output it needs, it will display the following and write nothing to the update.
No output from DShield
I’m should point out, I’m not saying the DShield block list was at fault on that fateful day, it’s simply an example to demonstrate the logic which has been added to mitigate unfortunate, or embarrassing outages.
The updated script can be found here
Doing these checks means that the script can be left to run in an automatic manner, and will take its own action if there’s something unexpected. You can, of course, amend the script to email you when it updates, so you can see whether there’s a problem downloading or processing the blacklists.