Load-Balancing Transparent Redirect with JunOS
Since setting up ‘Transparent Redirect with JunOS‘ some time ago I’ve been pleased with the way things have worked out. With a Blue Coat ProxySG appliance attached to my SRX210, intercepting is highly effective and when mixed with the excellent filtering capabilities of the ProxySG and Blue Coat’s ‘Web Pulse’ online rating system and their Web Filter database you get a very good level of protection from malware and malicious content.
Having gone through the Juniper Security course a while back, I’d spoken to the course instructor at the time about implementing load-balancing across multiple filtering devices to add capacity to the solution and perhaps enhance the speed with which content is retrieved. The course instructor had kindly given me a few tips on how to implement it, and so with some time to spare, I decided to try the setup.
As I only have one ProxySG to use, I decided to setup two Squid-Cache VM’s to test how to implement the solution. Admittedly, Squid-Cache doesn’t have the same level of filtering capabilities as the ProxySG, so instead, I mixed the load-balancing implementation with Blue Coat’s ThreatPulse cloud service. As a Blue Coat Blue Knight, I’m fortunate to have access to the TP Cloud service offered by Blue Coat, and one of the methods for accessing the service is using Proxy Forwarding (e.g it would work with ISA, Squid, ProxySG, etc or any other proxy solution which can forward to upstream servers). I won’t go into the ThreatPulse service setup here, however (maybe another time).
The topology is as follows –
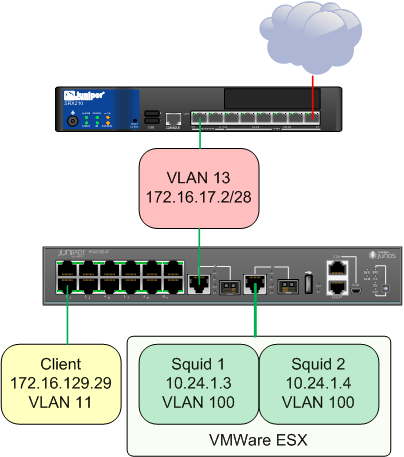
All devices are in the Trust zone for my purposes, but there’s nothing to stop you putting them in separate zones if you wish.
First off, as with the single transparent intercept solution I’ve written about before, we setup a routing instance to deal with what to do with the traffic once the firewall filter has intercepted it.
Here’s my Squid ‘routing-instance’ setup –

Both static route destinations have a ‘qualified-next-hop’ with preference of 5.
Here that is in display set form.
set routing-instances SQUID instance-type forwarding
set routing-instances SQUID routing-options options syslog level info
set routing-instances SQUID routing-options options syslog level debug
set routing-instances SQUID routing-options static route 0.0.0.0/0 qualified-next-hop 10.24.1.3 preference 5
set routing-instances SQUID routing-options static route 0.0.0.0/0 qualified-next-hop 10.24.1.4 preference 5
set routing-instances SQUID forwarding-options load-balance per-prefix hash-seed 1
The key here, to make load-balancing work, it seems is to set the forwarding-options addition to the routing-instance. The per-prefix hash-seed value is what makes the Packet Forwarding Engine perform the load-balancing.
Next, the filter, which is similar to the previous filter setup for redirecting to a single host (it’s the routing-instance configuration which makes the difference).
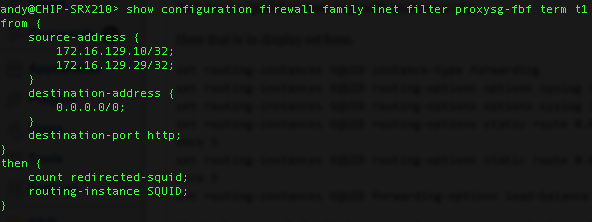
Here that is in display set format –
set firewall family inet filter proxysg-fbf term t1 from source-address 172.16.129.10/32
set firewall family inet filter proxysg-fbf term t1 from source-address 172.16.129.29/32
set firewall family inet filter proxysg-fbf term t1 from destination-address 0.0.0.0/0
set firewall family inet filter proxysg-fbf term t1 from destination-port http
set firewall family inet filter proxysg-fbf term t1 then count redirected-squid
set firewall family inet filter proxysg-fbf term t1 then routing-instance SQUID
You’ll notice my filter is called ‘proxysg-fbf’, this is because I’ve added the new filter term to redirect to the SQUID routing-instance into my existing filter-based forwarding configuration. I simply want to redirect two particular hosts to the SQUID instance for testing purposes, everything else would still go to the PROXYSG routing-instance. As with my previous example article, I’ve added a ‘count’ to the filter term to show me that traffic is matching.
For completeness, here’s the partially full filter including the use of both routing-instances (I’ve left out a filter term which has over 14,000 entries in it related to my article on ‘Dynamic Blocklists with Junos‘) –
set firewall family inet filter proxysg-fbf term t1 from source-address 172.16.129.10/32
set firewall family inet filter proxysg-fbf term t1 from source-address 172.16.129.29/32
set firewall family inet filter proxysg-fbf term t1 from destination-address 0.0.0.0/0
set firewall family inet filter proxysg-fbf term t1 from destination-port http
set firewall family inet filter proxysg-fbf term t1 then count redirected-squid
set firewall family inet filter proxysg-fbf term t1 then routing-instance SQUID
set firewall family inet filter proxysg-fbf term t2 from source-address 10.21.1.0/24
set firewall family inet filter proxysg-fbf term t2 from destination-address 10.11.3.0/24
set firewall family inet filter proxysg-fbf term t2 then accept
set firewall family inet filter proxysg-fbf term t3 from source-address 10.21.1.0/24
set firewall family inet filter proxysg-fbf term t3 from source-address 172.16.129.0/24
set firewall family inet filter proxysg-fbf term t3 from destination-address 0.0.0.0/0
set firewall family inet filter proxysg-fbf term t3 from destination-port http
set firewall family inet filter proxysg-fbf term t3 then count redirected-proxysg
set firewall family inet filter proxysg-fbf term t3 then routing-instance PROXYSG
set firewall family inet filter proxysg-fbf term default then accept
Term t1 – redirects to the Squid routing-instance
Term t2 – sets a bypass to term t3 if the source is 10.21.1.0/24 and the destination is 10.11.3.0/24
Term t3 – redirects to the ProxySG routing-instance.
Term default – accepts everything else. We need this, otherwise all other traffic would be dropped.
The firewall filter is assigned to an interface in the same way as before –
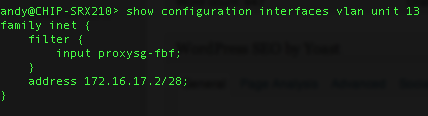
Here, I’m assigning the filter to an ingress/egress vlan on my SRX, but you could just as easily assign it to the ingress interface of VLAN 11 per my topology above.
My Squid configuration is very straight-forward. Both Virtual Machines have the following –
http_port 3128 intercept
acl localnet src 10.21.1.0/24 172.16.129.0/24
http_access allow localnet
forwarded_for on
cache_peer proxy.threatpulse.com parent 8080 0 no-query default
never_direct allow all
With Squid, as I’m intercepting transparently, I also needed to set the following in IPTables –
iptables -t nat -A PREROUTING -i eth0 -p tcp --dport 80 -j REDIRECT --to-port 3128
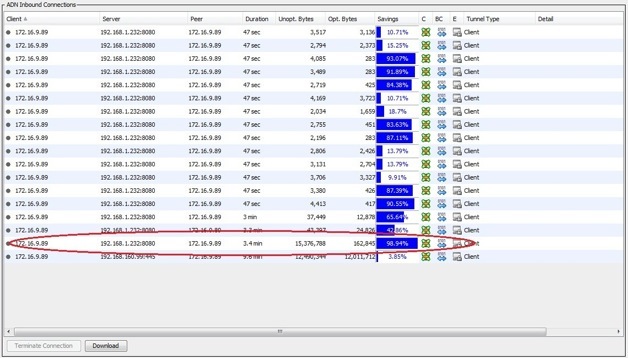
In the Squid Access logs, we can observe the traffic matching the filter –


Notice that both Squid-Cache processes are forwarding to proxy.threatpulse.com as per the cache_peer directive.
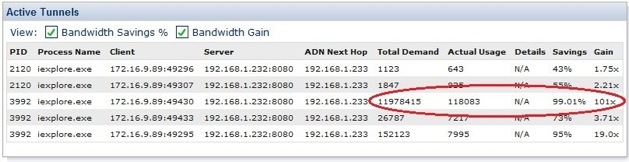
You can also observe traffic matching the filter on the SRX itself. Note the ‘redirected-squid’ counter.

So, after all this is done, how do I know I’m talking to a proxy, not the destination website from the clients perspective?
Well, one way is to do a ‘whats my ip’ type lookup. For example –

As you can see, we can detect whether a proxy is involved by using a lookup against request header values, like X-Forwarded-For. The IP also isn’t my home IP which I’d expect if I weren’t being sent to ThreatPulse.
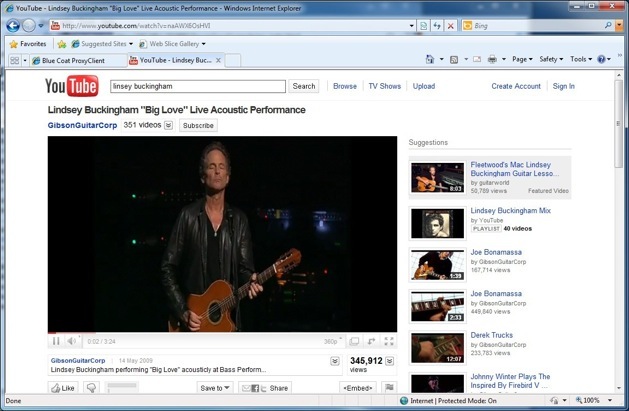
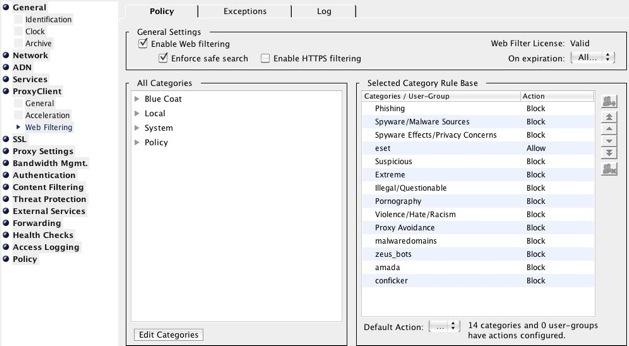
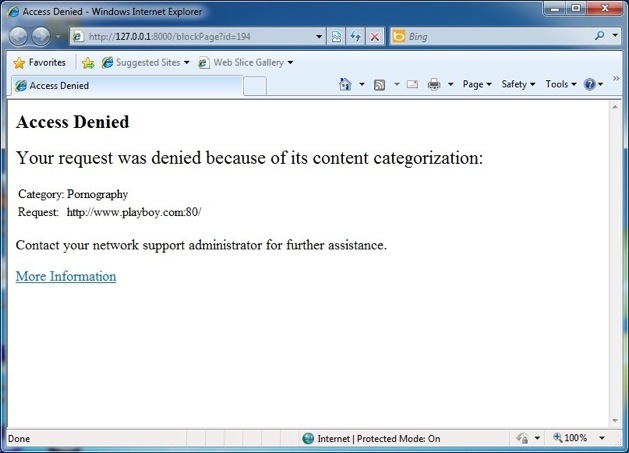
I can also confirm I’m being filtered by ThreatPulse by attempting to visit a site which is blocked per my configured policy –
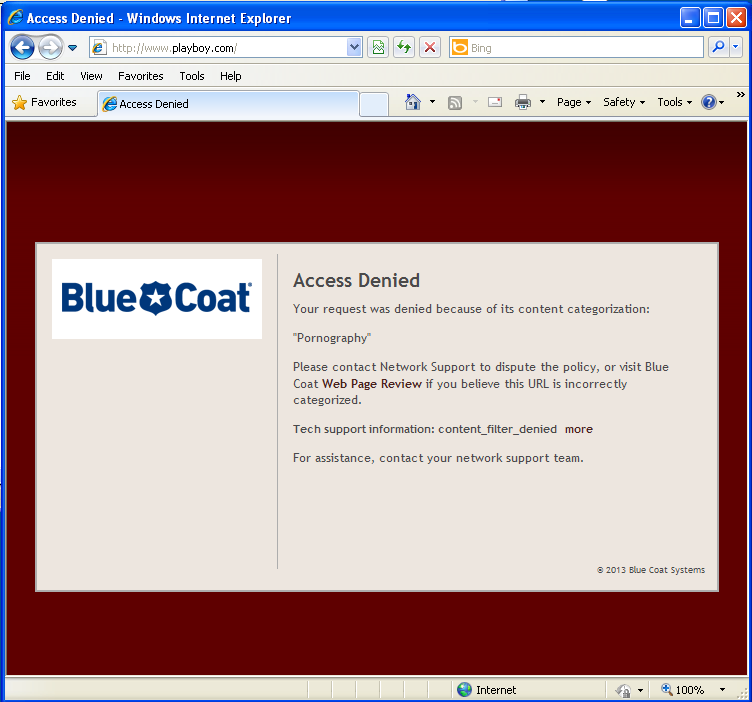
So there it is. Load-balanced Transparent Redirection using JunOS, Squid, and the extra benefit of Blue Coat’s ThreatPulse Cloud service.