DHCP IP Addresses with Blue Coat ThreatPulse/Juniper SRX
A problem landed on my desk the other day from a customer in relation to using the excellent Blue Coat ThreatPulse cloud SaaS product when the Juniper SRX sits behind a DHCP assigned public IP Address. Worse, due to the location of some sites and the ISP offering available, the SRX was itself behind a home broadband NAT router doing IPSec pass-through in order to establish a connection back to the corporate network.
ThreatPulse is Blue Coat’s SaaS which has been around for a couple of years and leverages the use of their existing Web Pulse(TM) dynamic rating system to categorise unknown URL’s on-the-fly or return previous categorisation. With Data POD’s located strategically around the world, it’s possible to control web access for HQ, home or roaming workers in a single place using one of several methods –
- Explicit Proxy – Configuring client browsers to use ThreatPulse directly
- IPSec Forwarding – Configuring an edge firewall to transparently intercept requests and send them to ThreatPulse using a LAN-to-LAN tunnel
- Proxy Forwarding – Utilising an on-site proxy to forward requests to ThreatPulse.
- Client Connector – A software package which sits on a client machine (Laptop/Mac) which transparently intercepts requests and sends them to ThreatPulse
- Mobility Connector – An iOS client which creates a VPN tunnel to ThreatPulse to control what apps and browsers can do on iDevices.
This particular problem, and the solution I came up with relates to the first three connection methods, Explicit Proxy, IPSec Forwarding and Proxy-Forwarding. Each of these methods requires that you setup a ‘Location’ within the ThreatPulse dashboard.

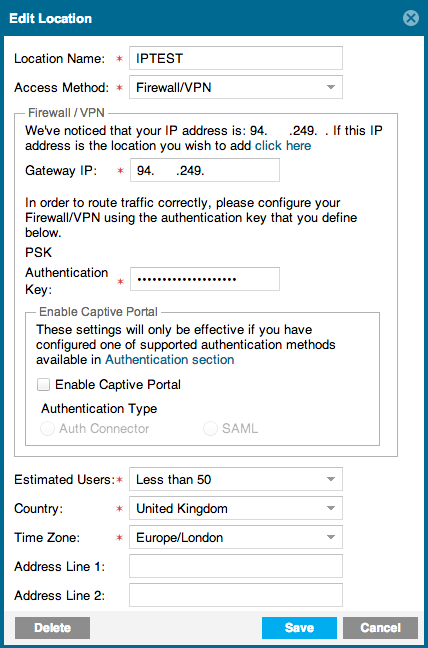
Selecting the IPSec (Firewall/VPN) location brings up its configuration section.

As you can see, there’s no place to update this dynamically, and ThreatPulse doesn’t support Aggressive mode VPN which can sometimes help to mitigate such problems. In this case, however, we have to do something at the SRX end.
There’s some useful information on Blue Coat’s Knowledge Base for making changes to ThreatPulse using the built-in API. The API is designed for situations like this where administrators need an automated way of updating ThreatPulse, but without having to login to the administration dashboard. Unfortunately, the documentation doesn’t specifically cover Juniper SRX (or SSG for that matter), it covers Cisco IOS and using ‘ip ddns’ commands to update the ThreatPulse service settings. All that said, the API can be used in-conjunction with the SRX and what follows is how I did it.
In some of my previous posts I’ve used the underlying BSD cli to update things like Firewall Filters. Using this method again, we can update ThreatPulse Location settings without having to login.
When in the shell of JunOS, there are several useful commands available – CP, CuRL, Diff, and Cat. These are used in the following script –
#!/bin/sh
cp ipnow.txt ipprev.txt
curl http://andymillett.co.uk/rip.php > ipnow.txt
IPN=`cat ipnow.txt`
if diff ipnow.txt ipprev.txt >/dev/null ; then
else
 curl "http://<user>:<password>@portal.threatpulse.com:8080/api/locations?name=<location>&type=<type>&ip=<NEWIPADDRESS>&key=<PRE-SHARED-KEY>"
fi
Basically, the script copies the last IP Address check results from ‘ipnow.txt’ to ‘ipprev.txt’, uses CuRL to get the Public IP Address at the time the script is run, and copies the output to a new ‘ipnow.txt’ file after which it performs a ‘diff’ against the two files within an ‘if’ statement. If the ‘if’ statement evaluates that the two files are the same, it does nothing, however if it evaluates that there is a difference, it performs a ‘cat’ against the new ‘ipnow.txt’ file and uses it as part of the new CuRL string sent to ThreatPulse API which updates the location.
The other end of this is a simple PHP page which returns the IP Address in text form.
<?php
function getIP() {
$ip;
if(getenv("REMOTE_ADDR"))
$ip = getenv("REMOTE_ADDR");
else
$ip = "UNKNOWN";
return $ip;
}
$client_ip=getIP();
echo $client_ip;
?>
All it needs is to be on a public Web Server somewhere the SRX can get too.
With both ends in place (the script on the SRX, and the PHP script on the Web Server), you can run the script manually if you like by running – ‘sh <script_name>’.
To test that the script would work properly, I setup two additional scripts on the SRX in our Lab. Both simply do a ‘load replace’ from a pre-defined file (script 1/2 data below) –
Script 1
{
echo "configure"
echo "load replace if15.txt"
echo "commit check"
echo "commit"
echo "exit"
} | /usr/sbin/cli
Script 1 data
interfaces {
replace:
fe-0/0/7 {
 unit 0 {
 family inet {
 address 94.17.248.15/27;
 }
 }
}
Script 2
{
echo "configure"
echo "load replace if16.txt"
echo "commit check"
echo "commit"
echo "exit"
} | /usr/sbin/cli
Script 2 data
interfaces {
replace:
fe-0/0/7 {
 unit 0 {
 family inet {
 address 94.17.248.16/27;
 }
 }
}
Following this, three cron entries were required to kick things off
*/5 * * * * (cd /cf/var/home/cronadmin; sh checkip.sh)
5 1,3,5,7,9,11,13,15,17,19,21,23 * * * (cd /cf/var/home/cronadmin; sh uif15.sh)
5 2,4,6,8,10,12,14,16,18,20,22 * * * (cd /cf/var/home/cronadmin; sh uif16.sh)
Line 1 executes my script to check the external IP address.
Line 2 executes the change IP ‘load replace’ script at odd hours.
Line 3 executes the change IP ‘load replace’ script at even hours.
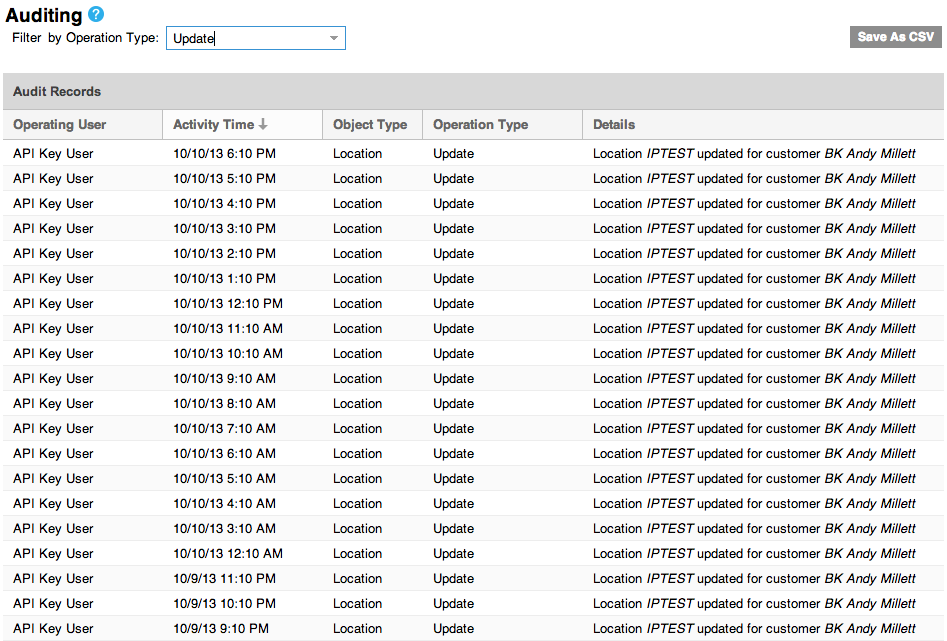
Having left this running for a week, the results are pretty good (below is from my ThreatPulse account under the Services / Account Maintenance section which gives a full audit of what has been happening under the account) –
Sweet! Simple Unix commands and a cron script save the day!
Unfortunately, I don’t have a DSL connection which I can put an SRX onto behind a NAT router, however this script will work irrespective of this (e.g it will pickup the public IP of the NAT router).
The above script is for IPSec Forwarding (Firewall/VPN in ThreatPulse speak), however the script above will work in just the same way if you choose to use the Proxy-Forwarding or Explicit Proxy method. For example –
Proxy-Forwarding
https://<username>:<password>@portal.threatpulse.com/api/location?name=<location_name>&ip=<IP_address>&type=proxy-forwarding
Explicit Proxy
https://<username>:<password>@portal.threatpulse.com/api/location?name=<location_name>&ip=<IP_address>&type=explicit-proxy
Now, you might perhaps notice that the above examples use HTTPS, whereas my script uses HTTP over port 8080. Weeeeeeell, unfortunately, when Juniper compiled JunOS and it’s associated libraries, the didn’t include HTTPS in ‘libcurl’ which leads to the following error if you attempt to use HTTPS –
curl: (1) Protocol https not supported or disabled in libcurl
This, despite the fact that the options are available under ‘–help’. For example –
-1/--tlsv1 Use TLSv1 (SSL)
-2/--sslv2 Use SSLv2 (SSL)
-3/--sslv3 Use SSLv3 (SSL)
That strikes me as a bit shoddy, but we have to work with what we get. Perhaps Juniper will fix it in later releases.
So there it is, if you have purchased Blue Coats excellent ThreatPulse SaaS (and, oh boy should you) and you have an SRX which is sat on a DHCP assigned IP address somewhere on your network, the above will help you keep ThreatPulse updated with any changes in the IP.
